Today I've got a card that I did for the Some Odd Girl Flickr 12 Weeks of Christmas Holiday Challenge - Week 2 - non-traditional colors. I dug through my stash and came across these really old papers from KI Memories that were perfect:
I used Pressie Mae and a sketch from Sketchy Thursday.
This is also for Fab 'n' Funky - recipe (1 ribbon, 2 patterned papers and 3 brads, buttons or gems). I hope you like it and TFL!
Tombows used:
Hair: 977, 969
Skin: 942, 850, 772
Dress and shoes: 723
Present: 673, 679
Eyes and shadow around Mae: 312
Friday, September 30, 2011
Thursday, September 29, 2011
Fairy Tink
Today I have a card made for the iCopic Weekly Challenge - red hair. I've never done red hair with Copics before, so this really was a challenge for me. Luckily I got a nice color combo off the internet and was able to do my first auburn/red hair coloring:
I used Fairy Tink from The Greeting Farm. I bought her as a rubber single, but it appears she's now only available as part of the Fairy Princess clear set. The sketch is from Sketch Saturday and the patterned papers are all from the Cosmo Cricket Odds & Ends Mini Deck.
I paper pieced her dress and used some old Stickles on her wings. The sentiment is from a·muse|studio and the bracket edger and doily dies are from My Favorite Things.
The colors I used for her hair were E13, E17, E18 and E19.
This is also for the following challenges:
- Stampin' for the Weekend - What a Cutie!
- Going Grey with Scrap Creations - It's a Girl Thing
- Simon Says Stamp - Anything Goes
- Belli Challenge - Paper Piecing
- Flutter By Wednesday - open theme (with fairy, angel or butterfly)
Tuesday, September 27, 2011
YNS Challenge #52
Yay! I have another Your Next Stamp Challenge today! This time we have a fun sketch challenge from Kerri:
And here's my card:
I used Fall Fun Bear and some old Basic Grey Mellow papers. As you can see, I didn't do any coloring on this card except for a light copic shadow under the bear. The falling leaf is paper pieced and all the leaves for the garland were punched out. For a bit of fun and texture, I did a tea-dyed twill ruffle for the scallop border part of the sketch.
We hope you'll play along with us! One lucky participant will be drawn at random to win the Light Up the Holidays Die and Stamp Set!!:
**Please don't forget our new rule: You MUST use a YNS rubber or digi image on your card!**
Full details can be found at the YNS Challenge Blog.
This is also for PaperPlay - Autumn Leaves, and Ribbon Carousel - Alter your spooled item (I dyed my twill and made it into a ruffle). I hope you like it and TFL!
More a|s
I decided to take another stab at the A-MUSE-A-PALOOZA Challenge 6 and here's what I came up with:
Instead of a flat background, I made a medallion to represent the sky and grass. I added a paper pieced tree and sentiment from Sampler Set One and a little bird from Sampler Set Three. BTW - the tree can be found in the "woodland friends" set, the sentiment is from "vintage a muse" and the bird is from "avian notes."
This is also for Simon Says Stamp - use dies and/or punches (I used a Fiskars punch to make my medallion), and Pile It On - Fancy Folds. I hope you like it and TFL!
a|s!!
It's official! I am now a consultant for a·muse|studio!! If you're not familiar with a·muse|studio, you can check out the regular 2011 catty and the Holiday 2011 catty online!
Here's my first card made almost entirely with my starter kit:
The only things I added were thread for machine stitching and a few foam boosters. The clouds, kite and sentiment are all from the Sample Set One and all the cardstock, ink and ribbon came from my deluxe kit.
I made this for the A-MUSE-A-PALOOZA Challenge 6: Fun with paper! We're supposed to use paper in a new or unexpected way. Hmmm... I think I've seen just about everything that can be done with paper, so I just did my best here! I paper pieced *everything* on this card (even those itty bitty kite tails) and I fringed and smushed up the gingham paper to make the grass.
This is also for Truly Scrumptious - Clean and Simple. I hope you like it and TFL!
Sunday, September 25, 2011
Thanks to You
Today I have a card done for the Waltzingmouse Sketch Challenge:
I printed out 2 Iralamija papers from the Chic Backgrounds Collage and cut them using a circle Nestie. I stamped it with the largest dotted circle from the Vintage Circles, Small set and pierced every dot. Next, I did a zigzag stitch where the 2 papers met. Then I stamped a small design from Fancy Phrases all over the edges of the scalloped green piece and stamped a sentiment from the same set onto a scrap of the polka dot paper and cut one end to make a flag.
I finished the whole thing off with some tea dyed twill, pink baker's twine (also tea dyed) and a pink button.
This is also for Stamp with Fun - Anything Goes. I hope you like it and TFL!
Friday, September 23, 2011
Go Forth & Eat Cake!
Today I have a card made for TCP Tuesday - make a seam binding rose and put it on your project. Here's what I came up with:
I used the adorable set Forget About the Cake and a sketch from Dutch Dare (turned from a square into a rectangle to fit my image).
I watercolored the image with my Tombows and hand dyed my own seam binding. After I made the rose, I stitched a pearl in the center to hopefully hold it together a little better!
This is also for The Pink Elephant and Cupcake Inspiration - both had inspiration pics with pink and green and the cuppy had roses on it too! I hope you like it and TFL!
Tombows used:
Plate and shadows: N95
Candle flames: 55
Candles and middle frosting layers: 158
Pink frosting and bunny nose: 703
Cake layers: 020
Thursday, September 22, 2011
Surprise! YNS Dies!!
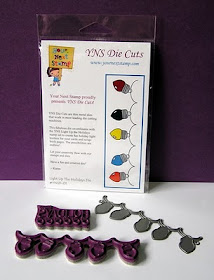
Yes, that's right - YNS now has its own custom dies available!! Our first die matches the large string of lights in the Light Up the Holidays set and it's so cool!! For all the details about the product, please visit the YNS Blog.
Many of the DT have made projects using the new die, so if you'd like a chance to win the fabulous prize pictured below (the stamp set and matching die), please visit and comment on all the participating blogs (the full list is on the YNS Blog).
For my project, I decided to continue on with my 3 Chocolate Challenge (in case you missed them, here are Part 1 and Part 2).
For this box, I simply took the bag from Part 2, and extended the ends to turn it from a bag into a box. Of course I did this in Make the Cut. After cutting, I printed the sentiment on both sides of the box, then folded it up and stuck in the 3 chocolates.
I stamped the holiday lights, colored them with Copics (I hope you get that I was trying to simulate white lights - I didn't just forget to color the bottoms!) and then die cut the string. Since I only needed 4 lights, I simply snipped the fifth light off then I attached the string with foam tape. I hope you like my project and TFL!
Monday, September 19, 2011
Birgitta Bookmark
Today I have a simple little bookmark made for the All That Scraps Fall challenge:
I watercolored Birgitta with my Tombows and used some Basic Grey paper to make the base of the bookmark.
This is also for the following challenges:
I watercolored Birgitta with my Tombows and used some Basic Grey paper to make the base of the bookmark.
This is also for the following challenges:
- Papertake Weekly - Things with Wings
- Flutterby Wednesday - anything goes with a butterfly, fairy or angel
- Cute Card Thursday - Anything Goes
- Paperplay - Punches and Dies (I used Nesties dies for the plain and scalloped rectangles)
Tuesday, September 13, 2011
YNS Blog Hop & Challenge #51
Hello everybody! Thanks for joining us for another fun and fabulous Your Next Stamp Blog Hop! YNS just released a whole bunch of new stamps so the DT (and our awesome guest designers!) have whipped up some eye candy using many of the new images. Plus, since it's also a challenge week, we've combined our current challenge of "paper piecing" with some of our Hop projects.
If you came here by way of Jen R.'s blog, then you're on the right track! If not, please go back and start at Kerri's blog because you won't want to miss a stop! This Hop starts on Wednesday, September 14th at 3:00AM (EST), and ends on Saturday, September 17th at midnight (EST).
And of course it just wouldn't be a YNS Hop without some specials and a prize, right?! Well, here's the awesome prize for one lucky winner - some of the brand new release stamps!
For the Specials part, Karen has some stamp bundles plus a free YNS stamp (of her choice) will be included for every $30 spent – so if you spend $30, you’ll get 1 free stamp, $60 you'll get 2 free stamps, etc… What an awesome deal!!
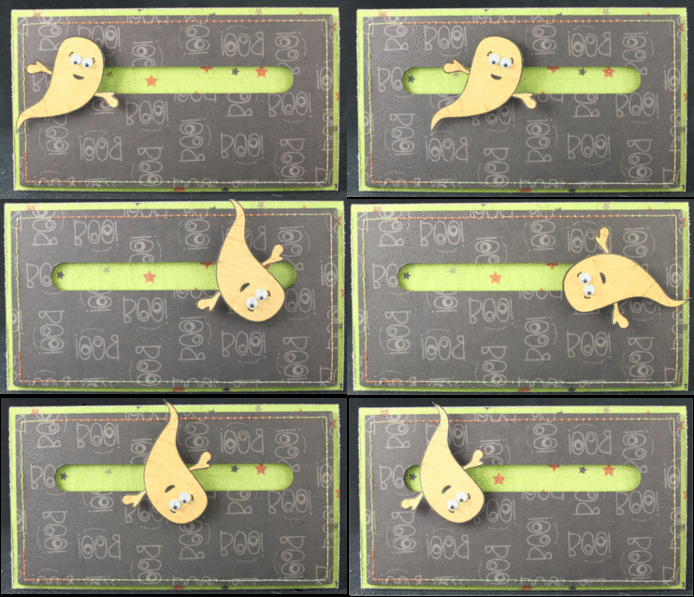
I had hoped to have more than 1 project to share with you today but I've been sick for a very loooong time now and it's been difficult to get too much done. I do hope the one project I made is to your liking though - it's a super fun spinner card using the new set Spooktacular:
You can see that I paper pieced the ghost and I even decorated the inside with the matching sentiment:
But that's not so impressive so I put together a little animated gif to give you an idea of how much fun this card is to play with!!
I hope you liked my project and thanks for hopping along with us! Your next stop is the incredibly talented and super awesome Carole.
If you came here by way of Jen R.'s blog, then you're on the right track! If not, please go back and start at Kerri's blog because you won't want to miss a stop! This Hop starts on Wednesday, September 14th at 3:00AM (EST), and ends on Saturday, September 17th at midnight (EST).
And of course it just wouldn't be a YNS Hop without some specials and a prize, right?! Well, here's the awesome prize for one lucky winner - some of the brand new release stamps!
For the Specials part, Karen has some stamp bundles plus a free YNS stamp (of her choice) will be included for every $30 spent – so if you spend $30, you’ll get 1 free stamp, $60 you'll get 2 free stamps, etc… What an awesome deal!!
*****And now on to the show!*****
I had hoped to have more than 1 project to share with you today but I've been sick for a very loooong time now and it's been difficult to get too much done. I do hope the one project I made is to your liking though - it's a super fun spinner card using the new set Spooktacular:
You can see that I paper pieced the ghost and I even decorated the inside with the matching sentiment:
But that's not so impressive so I put together a little animated gif to give you an idea of how much fun this card is to play with!!
I hope you liked my project and thanks for hopping along with us! Your next stop is the incredibly talented and super awesome Carole.
Sunday, September 11, 2011
Just For You!
Today I have another Sugar Bowl card for you:
I have a lot of Sugar Nellie stamps that have never seen ink so I'm trying to use them and what better way than to play in the Sugar Bowl? :)
I used Bumble Bee and paper from Iralamija's Elegance Papers Collage. She was watercolored with my Tombows and the ticket die from MFT was printed with a computer generated sentiment.
Tombows used:
Hair - N25
Skin - 990, 850, 772
Wings - 772
Dress - 91, 373, 772, 856
This card is also for the following challenges:
- Papertake Weekly - Anything Goes
- Ribbon Carousel - Anything Goes (with something that comes on a spool - I sewed a straight stitch around my whole card with thread from a spool)
- Little Red Wagon - Use a die cut (I used 2 different Nesties and also the mini ticket die)
- Stamp Something - Anything Goes
- Ping Gem - colour inspiration challenge
Saturday, September 10, 2011
TSGBDAY5
For Day 5, There She Goes wanted to see our paper dolls partying. I was pretty stumped for a while, but then as I watched my 2 young boys playing with their plastic food and dishes, I was struck by inspiration!
They had laid out a whole bunch of food on a box like a big buffet, so I managed to get penguin an invitation and he had a blast!
I hope you've enjoyed these past few days of puppet fun as much as I have and tomorrow we'll be back to our regularly scheduled stamping program! TFL!
They had laid out a whole bunch of food on a box like a big buffet, so I managed to get penguin an invitation and he had a blast!
I hope you've enjoyed these past few days of puppet fun as much as I have and tomorrow we'll be back to our regularly scheduled stamping program! TFL!
Thursday, September 8, 2011
TSGBDAY2, 3 & 4
Today I'm combining several days' worth of TSG birthday puppet posts:
Day 2's assignment was take our paper dolls out on the town. It was actually my birthday, so I took little penguin with me to eat sushi for my birthday lunch!
Here he is perusing the menu:
Grabbing some wasabi from the conveyor belt:
And finally chowing down on his fresh salmon sushi:
BTW - I know we were only supposed to take one picture, but I was having too much fun to stop at just one! :)
On Day 3, they wanted us to take our dolls into the Great Outdoors. Here's Penguin with our newest plant called "Hearts and Flowers":
He had to put on his shades because it was really sunny out there!
And finally, for Day 4 they wanted to see our dolls "in the spotlight." The interpretation of what that means is up to us and I went pretty literal - Penguin starring in his own puppet theater play!
The little theater is from Lettering Delights and instead of cutting out and assembling all the pieces, I just printed the whole theater (after adding the Penguin title) and then cut it out by hand.
Isn't this fun?! I'm going to try really hard to play in all the challenges this week! TFL!
Tuesday, September 6, 2011
TSGBDAY1
There She Goes is celebrating their third birthday with a week full of challenges and the first one from Monday was a Paper Doll Challenge. I went through all my sets and came across Penguin Love, which is one of my faves so I decided to use it. Here's my paper doll and I also made a tree to shade him from the hot Hawaii sun :)
The next challenge is to photograph your paper doll out on the town so I hope to get some good shots of him tomorrow! TFL!
Sunday, September 4, 2011
Mini Dry Erase Boards
Today I have a fun little altered project for you - Mini Dry Erase Boards that you can sit on your desk to take down notes:
If you don't like the dry erase aspect, you can easily stick a Post-It pad on the bottom instead!
I used 2 acrylic 4x6" picture frames and added Iralamija papers and some stash trims to make them both - super easy!!
These are also for the following challenges:
If you don't like the dry erase aspect, you can easily stick a Post-It pad on the bottom instead!
I used 2 acrylic 4x6" picture frames and added Iralamija papers and some stash trims to make them both - super easy!!
These are also for the following challenges:
- Cupcake Craft - Alter It
- Top Tip Tuesday - Shabby Chic
- My Time to Craft - "In Full Bloom"
- Ribbon Carousel - use at least 2 spooled items (they both use twine and twill)
Saturday, September 3, 2011
Manga Girl #1
Today I have a card using The Sugar Bowl sketch (optional theme is "one for the girls"):
I used Manga Girl #1, which I've had forever but didn't ink up until now!
She was watercolored with my Tombows and the papers are from the Happy Go Lucky 6x6 paper pad from My Mind's Eye. The die behind her is the smaller of the Dizzy Doily Duo Die-Namics set.
Tombows used:
Hair: N25
Skin: 990, 772
Dress and hair bows:757
Shirt: 126, 158
Shadow around her: 312
This card is also for Creative Card Crew - anything goes, and Charisma Cardz which is also anything goes! I hope you like my card and TFL!