Sunday, December 28, 2008

I got a Cricut Expression!

Woohoo! I'm having SO much fun playing with it! Of course I went totally overboard and got a ton of cartridges and a jukebox and the Design Studio software.

The first thing I had to play with were the two Hello Kitty cartridges. LOVE them - too cute!!


And then I had to create a template in Design Studio. You weave 2 pieces together to make this cute heart.

It's done with Plantin SchoolBook and I copied a Hot Off the Press template called Scandinavian Hearts. It was actually easier than I thought and a lot of fun to figure it out! I will definitely be looking around for other things to design!

Hope you don't mind a bunch of non-stamping projects, because I'll be posting a lot more Cricut projects in the future! TFL!

Thursday, December 25, 2008

Merry Christmas!

Wow, it's been a looooong time since I blogged last! The boys have been keeping me really busy and also stole all my mojo away!!

Here's a card I made a while ago:
I hope you all have a very Merry Christmas today!

Materials used: Heart Warmers set - Cornish Heritage Farms; patterned paper and alpha stickers - Basic Grey; ribbon - May Arts; rhinestone - the Rhinestone Guy.

Wednesday, November 26, 2008

Xmas Birds

Yes, it's another Pink Poison card day. I've been missing my mojo lately and have only been able to create with PP stamps lately, so the trend continues....

I got to pick a free set after my DH won the Mr. Stamper challenge and he helped me choose Xmas Birds. I just got it in the mail today (thanks so much Marie!!) and thought it was perfect for the latest Pink Poison sketch.

I stamped the banner in Pearlescent Sky Blue Brilliance ink so it has a nice shimmer IRL. I glued on tiny little rhinestones that also add a nice bit of sparkle.

I stamped the ribbon in black Brilliance ink on red cardstock, coloring portions with Copics for shading. I then cut out the whole thing, cutting off the tails so that I could reposition them to open up the bow a little more (if I had left the bow as is, the tails would have blocked the corner of the banner image).

I added some buttons tied with silver cording, ribbon and lace to finish it off. Oh, and also some patterned paper from Basic Grey. TFL!

Sunday, November 23, 2008

Mermaid Anya

For today's card, I decided to use a sketch from Our Creative Corner. I haven't had a chance to use this Mermaid Anya image yet, so I got out my brand new Peerless watercolors and had a lot of fun with her!

I love these tiny pearls from Kaiser Craft - the second smallest ones fit *perfectly* into the circles in Anya's hair! I also added a little sparkle to her shells and tail that I really wish I could capture better. I used a Sakura Stardust glitter pen, and instead of drawing right on the image (which I felt was just a little too harsh), I scribbled it onto a piece of plastic then picked it up with my waterbrush and spread it out evenly where I wanted it.

Lastly, I cut her out and popped her up on foam dots. The "For You" is from the Sentiments set.

Going back to the Peerless watercolors, I took a tip from Kim at MFT and made my own palette. -->

The only difference is that I used Excel to make up a spreadsheet (since I didn't want my messy handwriting all over these sheets). Then I stuck the finished palettes into a thin document holder that I bought from a local discount store to make them easy to put away when they're not in use (I wanted to make sure I don't accidentally touch the colors or spill something on them).

Yes, it's a little big, but I have a lot of colors and I didn't want the color blocks to be so small I'd have to be replacing them constantly. And even though I only have a tiny little bit of clear space on my desk right now, I was still able to color with it just fine.

Also, I just wanted to say that so far I'm really liking them. For the skin color, I did have to mix the color with water on a piece of plastic before I could use it (since it was way too dark), but all the other colors were just picked right off the papers with my waterbrush and then used to color as is. I found them very easy to work with and really like how they look. This doesn't mean that I don't still LOVE my Copics, just that I want options now that I love to color!!

Saturday, November 15, 2008

Mr. Stamper Challenge

ETA: Mike won!! And you can check out all the entries on the Pink Poison blog.

Marie issued a card making challenge on the Pink Poison blog for guys only and I convinced DH to do it! He took less time making this whole card than I usually do just pulling out supplies, and he totally blew me away with his creativity!!

He chose the Best Mates set because he had an idea to do a hand-drawn treasure map in the background. Didn't it come out great?! I love the way he colored it (with my Copics, of course!), especially her funky-cool hair!!

Notice his attention to detail: the torn and inked edges for that aged treasure map look!

He also did a neat card base which shows a big chunk of the back where he stamped the little ship and wrote his own sentiment. Awww - SO sweet!!

Honey - thanks for making a card for me. YOU argh my treasure!!

Wednesday, November 12, 2008

Tutorial Part 3 - Altering Nestabilities Shapes

Here's Part 3 of my series on altering Nesties shapes. If you missed Parts 1 and 2 please check them out!

**Disclaimer: I am using the old style Quickutz hand tool for this method and while I have seen on Ellen Hutson's blog here that smaller Spellbinders dies may be used in the QK tool, she doesn't specifically say if this method is safe for the Nesties. On the Spellbinder's site, they don't mention compatibility with the QK hand tool and do say that using their dies with any other machine may void the dies' warranties, so please be careful if you choose to follow this tutorial. Thanks! **

How to make a shape fatter:
1) Dig out your old Quickutz hand tool.

2) Cut your cardstock just slightly larger than you want your finished diecut to be (the hand tool has a very limited reach so you can't have too much excess cardstock). For this tutorial, I cut my cardstock 6.5" square. I'm using the same largest die in the Long Classic Scalloped Rectangles Large set.

3) Position your die cutting edge down on your cardstock and secure with removable tape.
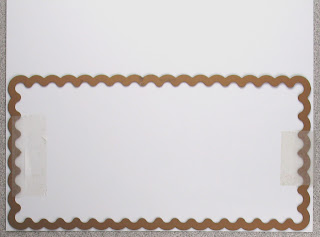
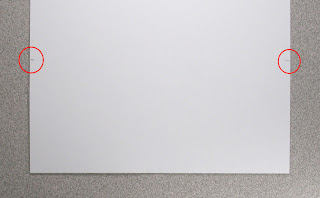
4) Flip your cardstock/die over and hold up to the light to see the die through the cardstock. Make 2 marks on the cardstock about 1 scallop in from the end. You must not cut past these marks.
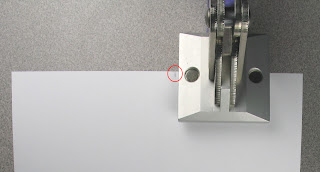
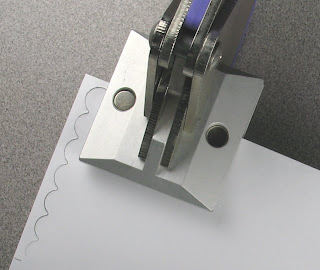
5) Position the hand tool next to one of the marks you made in the last step. The magnets in the tool should help to keep the die in place. Squeeze to make your first cut.
6) Move the hand tool over and squeeze to cut again.
7) Keep moving and cutting, making sure you are cutting all the way through the cardstock as you go.
8) Stop cutting when you get to the second mark.
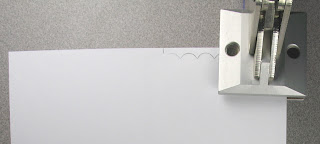
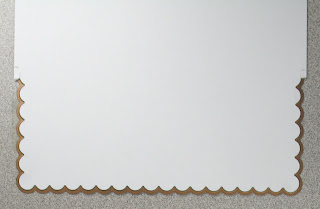
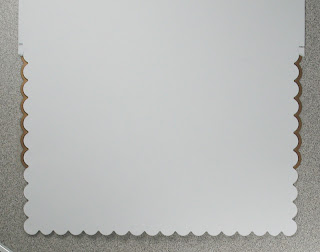
Here's what you have so far after the excess is removed.
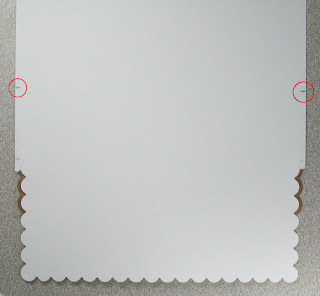
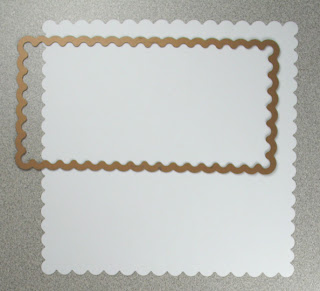
9) Just as in Part 2 of the tutorial, reposition the die so that only a couple scallops are in the die. Make 2 new marks to show you where to stop cutting.
10) Cut with the tool up to the new marks on both sides. I was only able to do about 1 cut on each side.
Here's what you have after this round of cutting with the excess removed.

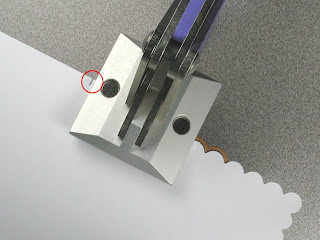
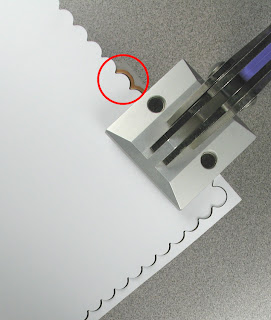
11) Continue moving the die and cutting until you get to the end of your cardstock. Position your die one last time and cut all the way around this final edge. Be careful that you don't cut too far. In the picture below, the circled area is the end of the die. If you cut there, you would ruin your diecut.
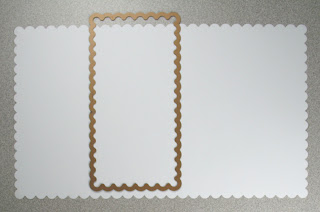
Here's the final diecut - a giant scalloped square!
And just to take it a bit farther, I started with a rectangle of cardstock 6 1/2" x 11" for this beauty!
And there you have it: A way to make ginormous diecuts with your Nesties. Hope you get some use out of this tutorial!!

Tuesday, November 11, 2008

Tutorial Part 2 - Altering Nestabilities Shapes

As promised, here is Part 2 of my tutorial. If you missed Part 1, you can check it out here. Also, I thought it might be important to know that I use the Big Shot. I've never used the Cuttlebug or Wizard machines, so I don't know if you can see what you're doing as well as with the Big Shot.

How to make a shape longer:
1) Line the die up with the edge of your cardstock and make 2 marks on the paper with a pencil as a guide - you cannot cut all the way to the end of the die. When you see these marks going into the machine, you know you have to stop cutting soon and reverse the direction you're cranking so the cardstock and die come back out the same way they went in [hope this makes sense]. The most important thing is that you DON'T feed in the end with all the excess paper first. If you do, you'll cut off all that excess paper and this technique won't work. [Of course making the marks isn't necessary, I just find it easier to see exactly where to stop cutting.]

After making the marks, place the die under the cardstock, cutting edge up, and run through machine, being careful not to cut all the way. It should look like this when it comes out of the machine:

And then it will look like this when you tear off most of the excess cardstock:

2) (This step is pretty difficult to see.) Re-align so that only a little bit of the previously cut piece is in the end of the die. For the scalloped dies, I tend to put about 2-3 scallops back into the die. You need to give yourself enough room to stop cutting so that you don't cut off the end you just made.

This is what it looks like with the cutting edge up:

And cutting edge down (it's best to use some removable tape to keep everything from shifting):

3) Now run through your machine, and just like the first cut, make sure you DON'T put the end with the excess cardstock through first. Crank the machine until it almost reaches the end of the die, but then stop and reverse so that the cardstock/die come back out the same way they went in. You should be able to see through the clear cutting plate if you've cut far enough.

It will look like this when you take it out of the machine:

And when you remove the excess cardstock:

And compared to the size of the die:


As for making the shape fatter, it's a lot more difficult. Because you have to feed the cardstock/die into the machine a certain way, it's impossible using the above method to make this longest die fatter (you would have to feed it in sideways and it's too long to fit through that way). BUT, you can do it with any die that will fit into your machine sideways. The longest scalloped die in the Small set will fit through sideways, but since you can only feed it in so far before you have to stop, you can't make the shape much fatter. Here's what I ended up with:


BUT.... at Lilian's request, I actually have figured out a way (just now!) how to double (or even triple or more) the width of the longest scalloped rectangle!! It's a lot more work, but you're not limited at all in the size diecut you can make!

Since this post is already really long and I have to do up the new tutorial, please join me tomorrow for Part 3!

Monday, November 10, 2008

Tutorial Part 1 - Altering Nestabilities Shapes

I've seen a few creations where people cut their Nestabilities die cuts and tape them back together to make them longer or shorter, so I decided to do a little picture tutorial on how I alter my Nesties shapes while still keeping them in one piece. This means no taping together and no joined line to worry about hiding! Yes, there are still limitations, but for the most part, I've found these techniques give me more than enough sizes for cardmaking.

I used the largest die in the Long Classic Scalloped Rectangles Large set. It may be a little easier to understand if you click to enlarge the pictures.

First I'll show you how to make a shape shorter (or skinnier) and then tomorrow I'll show you how to make a shape longer (or possibly fatter).

How to make a shape shorter:
1) Cut your piece out as usual.


2) Place your die down, cutting edge up, then take the cut out piece and re-align the sides within the cutting edge of the die, leaving one end protruding out beyond the edge of the die. You can see below that for this example, I'll be cutting off 3 scallops from the left side.

3) Run through your die cutting machine again being careful not to shift the die cut within the die. You can see from the picture below that a small portion of the die cut shifted when I ran it through the machine the second time. However, it's so small, you'll never notice!

4) This is the shorter die cut next to the die so you can see the difference in sizes, and also the little bit that was cut off. I've circled a tiny little sliver of extra paper that was left because of the shift. I just scratched it lightly with my fingertip and it came right off.

Using the same technique, you can also make the same die cut skinnier just by positioning the cut out piece differently in the die:
Please join me tomorrow for Part 2 of this tutorial!

Sunday, November 9, 2008

New Anyas

A little while ago, Marie at Pink Poison had a contest on her blog to make as many PP cards as we could. I really wanted to make a giant stack of cards, but life got in the way and not wanting to make slapped-together cards just to make a lot, I ended up with only 6. BUT, I'm really happy with how they all turned out, and that's what really matters to me! I wanted to share a couple I made with my new Anya images.

I found this cute heart and skull paper from Sassafrass Lass in my stash in a kit I got forever ago and thought it was perfect to go with Rockstar Anya. I colored her with Copics (including an extra guitar with arms attached for dimension) and accented her hairband with some Stickles. Then I cut her out, added the extra guitar, and put a ton of foam dots all over the back. The letter stickers also came from that same kit (it makes me SO happy to use up old stuff!!). To finish her off, I just did a bunch of sewing with black thread to frame her.

I've been wanting to use a Making Memories spiral journaling book for a while, but just couldn't find the right image to match until I got Teacher Anya. I traced the shape of the patterned paper onto my card base and cut it to match. Then I got the idea to just do black and cream with some red pops so I stamped her on cream cardstock and left her uncolored. I stamped an extra apple, colored with Copics and added some dimensional glaze, then stuck on with foam tape for dimension. She is also entirely cut out and stuck on with foam tape.

The Hello stamp is from the Lucky Bunnies set. I finished the card off with some red buttons and red velvet rick-rack held on with staples to complete the school look.

Thanks for looking and I hope you like them!!

Saturday, November 8, 2008

Baby Girl Beebo and Blog Candy

Today's card was made using the Little C's Weekly Challenge #16 sketch.

I used Baby Beebo from the Doodle Factory, and speaking of DF, they just released an adorable holiday set called Santa's Sweet Shoppe as well as a set of matching sentiments, and they're giving away both on their blog! Go check it out and spread the word for a chance to win!

Other materials used: sentiment - Papertrey Ink (Bitty Baby Blessings set); patterned paper (Nana's Nursery Baby Girl pad) - DCWV; ribbon - May Arts; word window punch and Creamy Caramel cardstock - Stampin' Up!; scalloped square Nestabilities.

Sunday, November 2, 2008

Embossed Wedding C.A.S.E.

Sorry it's been so long since my last post, but things have been totally crazy around here and I haven't had much time to play!

Wedding cards aren't my favorite to make because I have a hard time coming up with really elegant ideas. So when I had to make one recently, I turned to Heart Prints for help.

As soon as I saw this card, I knew I wanted to C.A.S.E. it. I just love all the embossing and tone on tone, and I'm such a sucker for hearts that this card spoke to me! I also love all the backgrounds where Sue combines the embossing with scored lines so I decided to do that as well and here's my finished card-->

Not much to explain except I used 2 different Cuttlebug embossing folders, the hearts were cut with my Nestabilities, and I did the score lines on my Scor-Pal.

Last, but certainly not least, I want to thank Enjoli for this sweet blog award and also for the kind words about my cards on her blog! I always love seeing works from other local gals and Enjoli's stuff rocks so please go check out her blog!!

Tuesday, October 21, 2008

Pink Poison Spotlight Part 2

Here are the other 3 cards I made for my Pink Poison Spotlight:

For this card made with the Cupcake set, I knew I wanted to use 3 of the cupcakes, but they wouldn't fit on a 1/4 sheet card, so I ended up making this long skinny thing that will fit in a business envelope.

I wanted this card to be really soft and sparkly and girly to go with the Sweet as a Cupcake saying. All the patterned papers are from The Sweet Stack, and even though it does have pre-glittered papers in it, I actually did the glittering on the striped paper with some Stickles. For more glitz, I went over the lines on the tops of all the cupcakes, and also around the edges of the sentiment block with a Stardust glitter pen.

Then to finish it off, I also added some lace, buttons tied with pink embroidery floss, and some satin ribbon.

I *so* adore the Cup of Stuff set! Not only are the mice images too cute, but I love the funky pretty flowers in the other cup!

For the first one, I did a bunch of cutting out and layering of different parts of the mice. Hopefully you can see it in the picture. I even stamped the tiny little mug on a bit of patterned paper from the same collection and popped it up with itty bitty hole punches. I used 2 different Stampin' Up! punches for the saying, which is from the Sentiments set.

On the oval, I sponged ink around the edges, and then felt it was a little harsh, so I rolled the edges in glue and covered it with Angel Dust glitter. I think it softened up the color just a bit and I love the sparkle. I also love these Heidi Grace Jolly and Bright papers!

As a last finishing touch, I decided to add the flower in the corner (what do you think?). It's a couple of silks from the craft store with a white brad for a center.

For the second one, I did a couple extra layers so that the mouse would be popping out of the cup, but I did the dimension a little weird so it's really hard to see in the picture. Once again the XOXO is from the Sentiments set. The patterned paper is Creative Imaginations, the ribbon is May Arts, and the foam letters are Thickers. If the size seems a bit weird, it's because this card will fit in your standard bill envelope.

And that concludes my Pink Poison Spotlight - hope you enjoyed all the cards! I'm hoping to have the new Anyas in my hands soon, so be on the lookout for more Pink Poison!

Monday, October 20, 2008

Pink Poison Guest Part 1

I cannot tell you how excited I am to be Marie's guest on the Pink Poison blog today!!! I ended up making 6 cards for my guest spot, and I don't want this to be the longest blog post ever, so I'm splitting it up into 2 posts.

I *adore* the Anya stamps because they're so cute and because they're so much fun for paper piecing and tole! I stamped Princess Anya onto white cardstock 3 times, and her dress portion onto 2 different patterned papers (the pink underneath is from The Luxury Stack by DCWV and the top is Two Scoops by Basic Grey). I colored her with my Copics and then proceeded to assemble - I popped up an extra face with bangs, and then just the bangs. You can see the dimension a little better in the close-up shot. Lastly I added the 2 dress pieces.

For the wand and crown, I colored them (including the lines) with a Sakura Stardust glitter pen, and then added 2 different sizes of rhinestones to the crown. It kind of looks gold in the close shot, but it's actually silver.

I punched a couple different sizes of circles from the Two Scoops papers, lightly tacked them onto the swirled background, and then sewed over them all with pink thread. Then I stamped Smile from the Sentiments set on a Cuttlebug tag and attached with some organdy ribbon.

I tried watercoloring before and wanted to play some more so I decided to use this gorgeous rose image from the Fancy Fleurs set. I was heavily influenced by Jerri Kay and Leslie Miller, specifically this post that I also followed for my last watercoloring attempt. I don't claim to have anywhere near their talent, but I'm still practicing!

I stamped and embossed in detail gold embossing powder then watercolored with reinkers. I only used 3 colors - Rocket Red and Pearlescent Ivy Brilliance, and Barely Banana from Stampin' Up! Just like my last try at watercoloring, this took me forever so I didn't want to do to much with the rest of the card that would draw attention away from the roses. Just a little strip of embossed cardstock, some Stampin' Up! ribbon, and another saying from the Sentiments set, and I was done!

I especially love the monkeys from the Best Mates set, so I made a card featuring one. You can probably tell that he's the topper for a paperclip bookmark, which is slipped into the little sewn pocket. I stamped him once on white cardstock and once directly onto the blue paper. I colored him with Copics on the white version and cut him out, leaving the tail out. I then glued him onto the blue piece.

All the patterned paper is from Stampin' Up! The saying is also from the Sentiments set and the velvet rick-rack is from May Arts.

Please come back tomorrow to see the details for my other 3 cards!

Wednesday, October 15, 2008

Sweet Scrappy Card

I'm calling this a scrappy card because it doesn't have any stamping on it at all. I just got The Sweet Stack from my local craft store (I've been wanting it forever) and I HAD to use this adorable pattern immediately!

This card was super easy: You see that bottom piece that looks like I used a border punch on it? I didn't - that's part of another pattern in the stack! I just stuck the 2 different pieces together and hid the seam with the ribbon. If I hadn't done the sewing and inking and distressing, this card would have taken me about a minute!

Now I'm a little sad that they don't sell this paper individually because I'd make a whole set of these as a gift!

Monday, October 13, 2008

Fluttering By Envelope Card

I created this card for the Verve Stamps' Celebrate Amy W Challenge which was to make a bright, cheerful, colorful card in honor of DT Diva Amy Westerman who will be leaving the team.

I just picked up the K&Co. Berry Sweet paper pad at a local craft store yesterday and thought the funky bright prints would be perfect for this challenge! I also thought that the Fluttering By set would go nicely with the paper.

I saw a card that looked like the back of an evelope while browsing through a Close To My Heart catalog and loved the look so I decided to try it. I really like how it turned out, so I will probably be doing more of them in the future. TFL!

Other materials used: white cardstock - Georgia Pacific; ink - Graphite Black Brilliance; ribbon - May Arts; Dew Drops - The Robin's Nest; Nestabilities.

Saturday, October 11, 2008

Another Penguin Birthday Card

Hubby reminded me yesterday that we have a first birthday party to go to tomorrow, so I grabbed the Smells Like Cake set from The Cat's Pajamas again and went to work. I picked this set because the theme is cupcakes and I think these penguins are just adorable!

The image is colored with Copics and I added some Stickles to the star and sprinkles on the cupcake. I even stamped and colored the envelope too!

Other materials used: white cardstock - Georgia Pacific; patterned paper - Basic Grey (Eva paper pad); Graphite Black Brilliance Ink - Tsukineko; organdy ribbon - Stampin' Up!; Dew Drops - The Robin's Nest (Paris assortment); rhinestones - The Rhinestone Guy; Nestabilities; Scor-It.