Showing posts with label Lettering Delights. Show all posts

Sunday, November 17, 2013

Magic Inside

Hi all!  I have a card today made for the Little Tangles Shaped Card challenge:

SantasTags1

Even though I used the set Santa's Tags, this is not a Christmas card.  It just expresses how I feel about my morning coffee!  I went with the Starbucks colors of white, green and kraft – all cut with my Zing using Make-The-Cut and the Lettering Delights cut set Love You A Latte.  I stamped the sentiment and added some doodle lines with a matching pen.  Finally, I added some rustic twine from May Arts.  I hope you like it and TFL!

Thursday, October 11, 2012

Let It Snow

Hi all!  I have a Fun Friday post for Your Next Stamp today.  Our theme this month is “Let it snow” and very appropriately I’ve used the Let It Snow stamp from the new Christmas Carol Circle Stamps set:

ChristmasCarolCircle2

I cut a snowflake from glitter paper using my Zing, Make-The-Cut and the Seasons Cut-It set from Lettering Delights.  Then I stamped the Let It Snow image and punched it out with a 1” circle punch.  I then tied the circle to the snowflake with a button and some silver cording.  This can be a package decoration or even an ornament or other home decoration. 

This is also for Divas By Design - Anything Goes and Loves Rubberstamps - Bling.

I hope you like it and don’t forget to check out the YNS Blog for all the other Fun Friday projects!  TFL!

Saturday, July 14, 2012

Noel

Hi all!  I have a Christmas card for you today because I’m playing along with several challenges that have it as their theme:

Noel1

I cut the pieces with my Zing using Make-The-Cut. The snowflake is from the Alpine Snow SVG set from Lettering Delights and the text paper and button are from a·muse|studio. Finally, the Holly Berry twine is from Trendy Twine.

This is for the following challenges:
I hope you like it and TFL!

Tuesday, July 3, 2012

4th of July Cracker

Hi all!  Today I have a non-stamped non-card for the 4th of July:


I used the Cracker Favor Boxes file, cut with my Zing using Make-The-Cut.  Then I used the shapes library in MTC to cut a bunch of stars and glued them to the cracker box.  I finished the box off with some Peppermint Stick and Blue Berry Trendy Twine. This is for the Trendy Twine July challenge - use the colors red, white and blue and matching Trendy Twine, and the Belli Challenge - anything but a card.  I hope you like it and TFL!

Tuesday, June 26, 2012

Nancy’s Buddies

Hi all! I have another shaped card for you today, this time using the Lettering Delights set Nancy's Buddies:

Nancy'sSquirrel1
I used the squirrel and tree stump images and added my own computer generated sentiment onto the stump. The whole thing was pieced with SU! cardstock which was cut with my Zing using Make-The-Cut.

This is for the Digital Tuesday Challenge - Amazing Animals. I hope you like it and TFL!

Sunday, June 24, 2012

Nancy’s Party Cards

Hi everybody! Today I have 3 cards to share with you! None of them involve stamping: I cut them all out with my Zing using Make-The-Cut and Lettering Delights files. Specifically, I used Nancy's Party (by the awesome Nancy Kubo). This first is a simple cupcake done with patterned papers from Basic Grey: Nancy'sCupcake1 This next is an adorable bear cupcake done with Stampin' Up! and Bazzill cardstocks, plus a teeny bit of Trendy Twine: Nancy'sBearCupcake1 And this last one is a modified card - you can see that the present is the "card" (the only part that opens up where you can write a message). The rest of the card is just the layers of the turtle that don't open up: Nancy'sTurtle1 These are also for Delightful Challenges - anything goes. I just adore making shaped cards and I'll have one more for you real soon! I hope you like them and TFL!

Sunday, January 15, 2012

Josie's Cupcake

Today I have a shaped card that I made for the All That Scraps Wednesday Challenge - Anything Goes:

JosiesCupcake1
I used the adorable digi image called Josie's Cupcake and formed the card shape in Make The Cut. I printed the image and sentiment (LD Little Piggy), then cut it with my Zing.

I colored her with Copics, paper pieced the cupcake liner, and then sewed beads on for the sprinkles. Lastly, I glittered up her wings. I hope you like it and TFL!

Tuesday, January 10, 2012

YNS New Release Hop!

Hello everybody! Thanks for joining us for another fun and fabulous Your Next Stamp New Release Blog Hop! YNS just released a brand new line of stamps - Jenny Suchin Designs, so the DT (and our awesome guest designers!) have whipped up some eye candy using the 4 new sets.

If you came here by way of Diana's blog, then you're on the right track! If not, please go back and start at Jenny Suchin's blog because you won't want to miss a stop! The Hop starts January 11 @ 3 a.m. EST and ends on January 16 @ midnight EST.

And of course there is a prize to be won! One of the stops is the secret blogger and a winner will be randomly chosen from the comments on that stop to win a new set of their choice! So the more blogs you comment on, the more chance you have to win!

And finally, there is also a sale!! 15% off your entire order - just use the code YNSJAN2012.

*****And now on to the show!*****

I got to play with the incredibly cute and fun Basket Animals set (as you may have seen in my sneak peek post yesterday. I made another of my Gatefold cards with a gift card pull-out (you can find a tutorial I did HERE):

AnimalBasket2a
I paper pieced the balloons and basket and colored both animals with Copics. The cloud is from the Lettering Delights SVG set Balloon Craze and was cut with my Zing. I then stamped the sentiment from the set on the cloud.

You may also be able to see that I made my own strings for the balloons with white Waxy Flax. The brown twine is from Trendy Twine

Here's a shot so you can see the gift card pulled out and also that the right panel opens for you to write a message to the recipient:

AnimalBasket2b
I hope you liked my project and thanks for hopping along with us! Your next stop is the incredibly talented guest designer Veronica.

Thursday, September 8, 2011

TSGBDAY2, 3 & 4

Today I'm combining several days' worth of TSG birthday puppet posts:

Day 2's assignment was take our paper dolls out on the town. It was actually my birthday, so I took little penguin with me to eat sushi for my birthday lunch!

Here he is perusing the menu:


Grabbing some wasabi from the conveyor belt:


And finally chowing down on his fresh salmon sushi:


BTW - I know we were only supposed to take one picture, but I was having too much fun to stop at just one! :)

On Day 3, they wanted us to take our dolls into the Great Outdoors. Here's Penguin with our newest plant called "Hearts and Flowers":


He had to put on his shades because it was really sunny out there!

And finally, for Day 4 they wanted to see our dolls "in the spotlight." The interpretation of what that means is up to us and I went pretty literal - Penguin starring in his own puppet theater play!


The little theater is from Lettering Delights and instead of cutting out and assembling all the pieces, I just printed the whole theater (after adding the Penguin title) and then cut it out by hand.

Isn't this fun?! I'm going to try really hard to play in all the challenges this week! TFL!

Wednesday, August 17, 2011

I *Heart* Twine!

I have a couple of Timeless Twine projects to share with you today (sorry - no stamping!). For both projects, I designed them using Make the Cut and cut with my Cricut E (only in use until I get my Zing!).

The first is a little tag/card to attach to a thank you gift:

ThankYouSewMuchTagTwine1
The spool is from the Seamstress Cut It Simple Shapes set from Lettering Delights. I created a little card and also an extra spool to wrap the twine around, then glued the extra spool to the front of the card. The hanging loop is attached to the back panel of the card. I used Pumpkin Orange and White Timeless Twine.

And here's a full size card using Krazy for Kraft Timeless Twine:

ThanksSewMuchTwine1
Just like the tag, I created a base layer and also cut an extra spool to wrap the Kraft twine around. I also tied a bit of the twine around the twill bow to bring it all together.

I hope you like them and another big thanks to Stacy for this fabulous twine!!

Monday, August 15, 2011

Here's a hug!

*ETA: I used my Cricut Expression to cut the shaped card first. Next, I printed the image onto plain printer paper and taped the cut image over the printed image, using my light box to line it up properly. Finally, I printed again to get the image onto the cutout. I did not do an actual "Print and Cut" with this as I have a hard time lining things up just right on my E. Hope this helps!

Hi everybody! I have another non-stamped card for you today. Lettering Delights introduced "Cut It Tiles" last week and wants to see projects using them for a chance to win an LD gift certificate. Well, since I *love* LD, I just had to try!

Cat Hug LD
The cat image is from the No Rhyme SVG set (but in this case, the cat is printed, not actually cut out), the font is LD Little Piggy and for the tiles, I used the Matryoska Tiles.

Unfortunately, you can't see the texture of the tiles too well in this picture, but I can tell you that I tiled every layer of the cat except for the yellow shadow and his beige face. I set the tile size really small so it would just add a subtle texture, but not draw too much attention to itself. The whole thing was designed, printed and cut using Make The Cut software (LOVE this program!!).

I punched 2 little holes on either side of the beginning of his tail and tied 2 strands of Krazy for Kraft Timeless Twine into a bow around it. I hope you like my card and TFL!

Friday, August 5, 2011

Happy Halloween!?

Yes, even though it's only the beginning of August, I have a couple of Halloween projects to share with you today! I wanted to play with the Orange Licorice Twist Timeless Twine from Stacy so I came up with a couple of fun pails using clear minis I got from my local craft store. The first one is meant to hold Halloween candy (I don't currently have any so I just stuffed some little bags of fruit snacks in there):
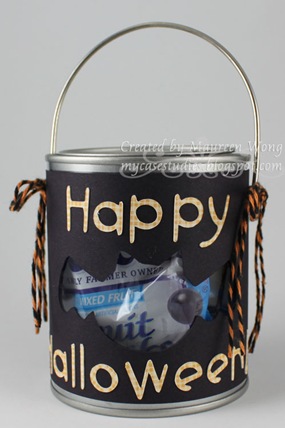
Mini Halloween Candy Pail 1a
I designed the whole thing in Make the Cut and cut with my Cricut (in use only until I get my KNK Zing - I can't wait!!!).

For the bat, I used Lettering Delights' DB Boo Ya and the sentiment was done with LD Little Piggy.

For the candy pail, the bat is actually cut out of the black layer so you can see what's inside, and then the letters were cut out separately of orange patterned cardstock and glued on the black layer. I then tied 2 strands of twine on each side of the handle into bows:

Mini Halloween Candy Pail 1b
My second project is meant to hold a battery powered tealight candle:
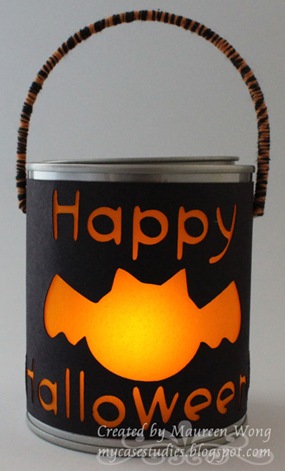
Mini Halloween Votive Pail
I used basically the same design as the candy pail, but this time I also cut out the letters from the black layer so the light would show through them. I glued a piece of orange vellum to the back of the black layer so you can't see the actual tealight candle through the bat cutout.

Here's a shot of what it looks like in MTC:


To finish it off, I glued twine all around the metal handle.

BTW, if you haven't already "liked" the Timeless Twine Facebook page, go ahead and do it now - ‎if Timeless Twine reaches 300 Page likes they will be giving away 3 Spools of Classic Timeless Twine colors! For extra entries, be sure to share and refer your friends and have them mention that you sent them.

I hope you like my projects and TFL!

Wednesday, July 27, 2011

Got Lunch?

I have completely lost my stamping mojo (hence the lack of posts on my blog lately), but I have felt like making something....

Today my hubby forgot to take his lunch to work with him. It happens so often that he asked me to make a little sign for him to leave on his wallet to remind him to grab his lunch from the fridge before he leaves. I played with a few ideas, then remembered a super cute SVG set from Lettering Delights that I bought a while ago, but haven't actually used yet and came up with this:

Lunch Reminder Tag

The set is called Stuck On You and has a bunch of peanut butter and jelly images/sentiments. One of hubby's fave foods is peanut butter sandwiches, so I knew this image would be perfect for his reminder!

And it was so easy - ALL done in Make The Cut! I'm using the new version 3.3.2 and was able to bring the SVG image right in through the program (LOVING this new feature!!). And since it came in colored, I didn't have to do anything, but add my sentiment using the font LD Little Piggy, a tag border and a tiny circle so I'd know where to punch a perfectly centered hole to add my Krazy for Kraft Timeless Twine (thanks Stacy!!).

Then instead of cutting everything out, I just printed it! I did this because I wanted it flat so I could cover the tag with clear Contact Paper to protect it. I punched the hole and tied 2 strands of twine into a bow at the top. Finally, I added a little piece of sheet magnet on the back so it can stick to the fridge when not in use.

I hope you like the project and the idea of a lunch reminder and don't mind non-stamping projects on my blog, because I have a couple more to share later! TFL!