Showing posts with label Cricut. Show all posts

Thursday, October 27, 2011

Winter Scene Coaster Frame


I have another non-card project for you today - a coaster picture frame using the new Winter Scene stamp from YNS.

Here's the outside front of the coaster - I cut the words using my Cricut and Make the Cut software:

WinterScene1a
And here's the inside:
WinterScene1b
The scene was watercolored with Tombows and the picture can actually be changed out (it's not glued in there).

Please stop by the YNS blog for more new release awesomeness and info! TFL!

Wednesday, October 26, 2011

YNS New Happy Holidays Stamp and Die Set!


Hey everybody! Today I have a lot of stuff all rolled up into one post! First off is our current YNS Challenge #54 - ABC (Anything But a Card). Next is our new Happy Holidays Stamp and Die set release! I used 2 different stamps with matching dies on Part 4 of my little 3 chocolate challenge (here's Part 3 in case you missed it!).

Front:
WinterWarmUp1a
Back:
WinterWarmUp1b
And just to prove it really holds 3 Dove chocolates:
WinterWarmUp1c
It's a little round top box (inspired by a template sold by Papertrey) that I shrunk down to just fit the 3 chocolates.

And finally, today is a prize day in our YNS 14 Day Release party - one lucky winner will get the new stamp and die set!! Please visit the YNS Blog for all the details. You only have 24 hours to enter, so hurry over now! :)

Thursday, September 22, 2011

Surprise! YNS Dies!!


Yes, that's right - YNS now has its own custom dies available!! Our first die matches the large string of lights in the Light Up the Holidays set and it's so cool!! For all the details about the product, please visit the YNS Blog.

Many of the DT have made projects using the new die, so if you'd like a chance to win the fabulous prize pictured below (the stamp set and matching die), please visit and comment on all the participating blogs (the full list is on the YNS Blog).


For my project, I decided to continue on with my 3 Chocolate Challenge (in case you missed them, here are Part 1 and Part 2).


For this box, I simply took the bag from Part 2, and extended the ends to turn it from a bag into a box. Of course I did this in Make the Cut. After cutting, I printed the sentiment on both sides of the box, then folded it up and stuck in the 3 chocolates.

I stamped the holiday lights, colored them with Copics (I hope you get that I was trying to simulate white lights - I didn't just forget to color the bottoms!) and then die cut the string. Since I only needed 4 lights, I simply snipped the fifth light off then I attached the string with foam tape. I hope you like my project and TFL!

Thursday, August 25, 2011

3 Chocolate Challenge Part 2

As you can see from the title, this is the second part of my personal 3 Dove chocolate challenge. (Here's Part 1.)

I made this for the Simply Betty Challenge - make a Halloween treat container:


I already had a bag template that I designed in Make the Cut from this project, so I just made it really tall and skinny to perfectly fit the 3 chocolates. I sized down digi Betty so she would also fit on the little bag and printed her on both sides after it was cut out. The final touches are some die cut grass and Halloween Timeless Twine.

This is also for Dutch Dare - Anything but a card. Hope you like it and TFL!

Tuesday, August 23, 2011

Marci & Luka Birthday Blog Hop!

HIP, HIP, HOORAY, Marci and Luka had a BIRTHDAY!
On August 1st Marci and Luka finally turned ONE and we're having a blog hop to celebrate! Even though I'm no longer on the LLLC DT, I (along with other alumni and friends) was invited back to join in the celebration! If you came from Leanne's blog, then you're on the right track. However, if you just came across my blog, you'll want to start at Becca's blog because all this awesome eye candy is not to be missed!

On top of the special guest bloggers, LLLC is offering up a HUGE BLOG CANDY for this exciting event - Take a look at this prize package:

Click to play this Smilebox collage
Create your own collage - Powered by Smilebox
Customize your own photo collage
This Blog Candy contains the following:
~ Set of 12 Copic Markers in NEW 2011 colors
~ Set of Spica Pens
~ Pack of X-Press Blending Cardstock
~ New Scor-pal and pack of Scor-Tape
~ 3 sets of 12x12 Basic Grey Collections paper packs
~ $20 gift certificate to the La-La Land Crafts Store

To be eligible for this FABULOUS blog prize, you must follow 3 easy rules that are explained on the La-La Land Crafts Blog. You have until August 31st to enter and the winner’s name will be drawn on September 3rd.

*****And now on to the show!*****

As soon as I saw Buccaneer Marci, I immediately thought of a birthday project with a pirate-y saying and here it is (you can click for a larger picture):

BuccaneerMarciPail1a
This is a 5" tall clear pail that I got from my local craft store. I used Make the Cut to design a divider for the pail and even printed the sentiments through MTC! In case you can't quite see it, the bottom says "It's y-arrr birthday!"

I watercolored Marci with just brown Tombow markers then cut her out and popped her up with foam boosters. I inked and crumpled the divider before I stuck her on to look like something old (like a treasure map).

Here's the back of the pail:

BuccaneerMarciPail1b
The top says "Enjoy your booty!" I filled this section with some chocolate coins and some cash with iridescent filler.

I hope you liked my project and thanks for hopping along with us! Your next stop is the incredibly talented Pops.

Saturday, August 20, 2011

3 Chocolate Challenge Part 1

When I saw the current Tiddly Inks Challenge - make a wee little project, I was immediately inspired. Well... that first try didn't turn out, but I took another stab at it and came up with this little treat box:

SendMeASignBugg2a
I used Send Me a Sign Bugg (one of my faves!) and the Cosmo Cricket Social Club Mini Deck. I designed the little box and the cutting file for the Bugg in Make The Cut and printed the Bugg onto the cut out through MTC. Finally, I also printed the scraps for the paper piecing and added the text to the sign using MTC. The box is just under 1.5" wide, 1.25" tall and 1.25" deep and holds 3 Dove chocolates.

You can see from this back shot that the back of the Bugg is covered (to hide the Copic bleed-through and just make it look a little nicer) and is tucked into the back of the box (which would normally be the front opening):

SendMeASignBugg2b
And here's a shot to show the 3 chocolates inside and the Bugg pulled out:

SendMeASignBugg2c
After I showed my hubby the project, he said I should challenge myself to make as many projects as I could that hold 3 Dove chocolates (a nice little favor size) and I took him up on the challenge! So watch this space for more installments of the "3 Chocolate Challenge." :)

Wednesday, August 17, 2011

I *Heart* Twine!

I have a couple of Timeless Twine projects to share with you today (sorry - no stamping!). For both projects, I designed them using Make the Cut and cut with my Cricut E (only in use until I get my Zing!).

The first is a little tag/card to attach to a thank you gift:

ThankYouSewMuchTagTwine1
The spool is from the Seamstress Cut It Simple Shapes set from Lettering Delights. I created a little card and also an extra spool to wrap the twine around, then glued the extra spool to the front of the card. The hanging loop is attached to the back panel of the card. I used Pumpkin Orange and White Timeless Twine.

And here's a full size card using Krazy for Kraft Timeless Twine:

ThanksSewMuchTwine1
Just like the tag, I created a base layer and also cut an extra spool to wrap the Kraft twine around. I also tied a bit of the twine around the twill bow to bring it all together.

I hope you like them and another big thanks to Stacy for this fabulous twine!!

Monday, August 15, 2011

Here's a hug!

*ETA: I used my Cricut Expression to cut the shaped card first. Next, I printed the image onto plain printer paper and taped the cut image over the printed image, using my light box to line it up properly. Finally, I printed again to get the image onto the cutout. I did not do an actual "Print and Cut" with this as I have a hard time lining things up just right on my E. Hope this helps!

Hi everybody! I have another non-stamped card for you today. Lettering Delights introduced "Cut It Tiles" last week and wants to see projects using them for a chance to win an LD gift certificate. Well, since I *love* LD, I just had to try!

Cat Hug LD
The cat image is from the No Rhyme SVG set (but in this case, the cat is printed, not actually cut out), the font is LD Little Piggy and for the tiles, I used the Matryoska Tiles.

Unfortunately, you can't see the texture of the tiles too well in this picture, but I can tell you that I tiled every layer of the cat except for the yellow shadow and his beige face. I set the tile size really small so it would just add a subtle texture, but not draw too much attention to itself. The whole thing was designed, printed and cut using Make The Cut software (LOVE this program!!).

I punched 2 little holes on either side of the beginning of his tail and tied 2 strands of Krazy for Kraft Timeless Twine into a bow around it. I hope you like my card and TFL!

Wednesday, August 10, 2011

YNS' 2nd Birthday Blog Hop

Photobucket

Hey everyone and welcome to YNS' 2nd Birthday Blog Hop - we are so happy you are here celebrating with us and our wonderful guest designers! If you have been hopping along and are arriving from Diana's blog then you are right on track! But if you just happened across my blog and want to join in all the fun and games, then you can go to the start at Peggy's blog.

What is a birthday party without games and some AMAZING prizes? Well we have a fun little puzzle for you to solve along the hop and when you do you will be entered into the draw for one of TWO amazing YNS prizes:


Not everyone has a puzzle piece so you need to pay attention, and click on the puzzle pieces, and follow the directions as you find them along the way (3rd party cookies must be enabled to do the puzzle). When you are done put them all together at the end of the hop for your chance to win! You have until Monday, August 15th, at Midnight EST.

*****And now on to the show!*****

Today I have 2 projects (because it's YNS' 2nd birthday!) to share with you. The first uses the new set Yummy in My Tummy (isn't that such a fun name?):

YummyInMyTummy1
I used the August Sketch For You To Try and some adorable papers from the My Mind's Eye Life of the Party 6x6 paper pad.

The image was stamped and colored with Copics, then I added an extra popped up spoon, clear dimensional adhesive all over the glass, and custom dyed bugle beads for the chocolate sprinkles (I just put them on a little disposable plate and dripped brown Copic reinker on them). The sentiment is cut from one of the papers in the pad.

My second project is just a bit more complicated. Here's the outside shot:

MakeAWish4a
And here's the inside:

MakeAWish4b
You can see that the candle flames' "halos" are attached to the front and back layers so they pop out when you open the card! I used the Make A Wish set (one of my fave YNS sets!), Eat Cake and Be Merry (inside sentiment), the MME True Blue 6x6 paper pad and Make the Cut. I can't take all the credit though - the idea came from an old book I was looking through called "Making Great Handmade Cards" from Hot Off the Press. The card in the book had hand-cut layers and I knew I could do it more easily with MTC and my Cricut!

The whole card is cut through MTC except for the individual candles. For those, I stamped the flames on white and colored with Copics, then paper pieced the bottoms. Even the sentiment banners were cut through MTC! Finally, I finished the card off with some pumpkin orange and white Timeless Twine.

There are also lots of amazing deals right now in the YNS store to celebrate and you don't need any code! The next stop on the hop is the totally fabulous Carole! Good luck and happy hopping! ~Maureen

YNS Birthday Puzzle Piece

Friday, August 5, 2011

Happy Halloween!?

Yes, even though it's only the beginning of August, I have a couple of Halloween projects to share with you today! I wanted to play with the Orange Licorice Twist Timeless Twine from Stacy so I came up with a couple of fun pails using clear minis I got from my local craft store. The first one is meant to hold Halloween candy (I don't currently have any so I just stuffed some little bags of fruit snacks in there):

Mini Halloween Candy Pail 1a
I designed the whole thing in Make the Cut and cut with my Cricut (in use only until I get my KNK Zing - I can't wait!!!).

For the bat, I used Lettering Delights' DB Boo Ya and the sentiment was done with LD Little Piggy.

For the candy pail, the bat is actually cut out of the black layer so you can see what's inside, and then the letters were cut out separately of orange patterned cardstock and glued on the black layer. I then tied 2 strands of twine on each side of the handle into bows:

Mini Halloween Candy Pail 1b
My second project is meant to hold a battery powered tealight candle:

Mini Halloween Votive Pail
I used basically the same design as the candy pail, but this time I also cut out the letters from the black layer so the light would show through them. I glued a piece of orange vellum to the back of the black layer so you can't see the actual tealight candle through the bat cutout.

Here's a shot of what it looks like in MTC:


To finish it off, I glued twine all around the metal handle.

BTW, if you haven't already "liked" the Timeless Twine Facebook page, go ahead and do it now - ‎if Timeless Twine reaches 300 Page likes they will be giving away 3 Spools of Classic Timeless Twine colors! For extra entries, be sure to share and refer your friends and have them mention that you sent them.

I hope you like my projects and TFL!

Friday, April 8, 2011

YNS Surprise Release Blog Hop!


Welcome to the Your Next Stamp Surprise Release Blog Hop! If you didn't arrive here from Diana's blog, please CLICK HERE to go to Karen's blog and begin hopping! The hop starts today (Friday, April 8th at 8:00 EDT) and ends on Sunday, April 10th at midnight (EDT).

So what's this surprise hop about? You may remember that last year Karen was approached by Lisa (owner of ScrapFest in Ontario) to design an exclusive stamp for ScrapFest October 2010. Well, Karen was asked to design another exclusive YNS stamp for this weekend's Kitchener ScrapFest so we're having a hop to celebrate! Woohoo!!

Both of the exclusive ScrapFest stamps will be available to buy at the YNS booth at ScrapFest or online from the YNS store for the duration of the hop only! And as an added incentive, Karen is offering both stamps at a special price of only $6 each, AND you also get FREE SHIPPING for your entire order - use code SF2011 when checking out.

As always here at YNS, we have a wonderful prize for you to win! One lucky winner will be drawn at random from the linky list to receive both ScrapFest stamps (Cropper Fhiona and the brand new Shopper Fhiona)! If you purchase one or both of the ScrapFest stamps and happen to win the prize draw, you will be given a $6 or $12 credit to spend at the YNS store as your blog hop prize instead!

It's not a requirement for you to comment at every stop along the hop to be eligible to be entered into the prize draw, but the DT would sure love to hear what you think of our ScrapFest creations!


*****And now on to the show!*****

Before I get to my ScrapFest projects, I wanted to show you a card I made with a super cute new stamp set that was just released called A Good Friend (you can click to enlarge all pics):
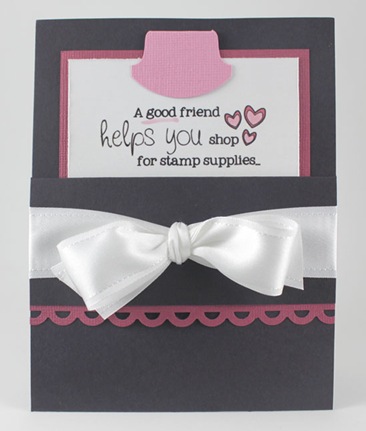
AGoodFriend1a
It's a pocket card and here's what the insert looks like when you pull it out:

AGoodFriend1b
Isn't that sentiment too funny? And I love all the different shopping bags! BTW - Kerri made the cutest pocket tag with this set and even posted a tutorial which you can find HERE. I also have another project using this set and will be posting it and a tutorial on the YNS blog in the near future - watch for it!

And now for my ScrapFest projects! Here's our brand new exclusive image called Shopper Fhiona:

ShopperFhiona1a
This is a combo gatefold card with a pull-up gift card holder! You can open up the left side to write your message and then when you pull up the twine bow on the right, it reveals a gift card:
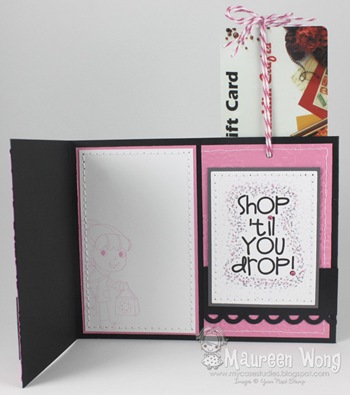
ShopperFhiona1b
The pull-up idea isn't mine (it's been around for years) and I adapted this tutorial to my gatefold card. One little thing I did differently was to put the GC with twine into the right hand side of the card, insert the twine through the holes, then glue the bottom and side around the GC to make sure the fit wasn't too tight (hope that makes sense). If you glue the GC pocket flat, it will be really hard to slide the GC in and out of the pocket. The twine is Strawberry Cupcake Trendy Twine - love this twine!! I also used it for the bow in her hair and her bag handle. Lastly, the sentiment was computer generated.

And now here's a new project using last year's Cropper Fhiona:
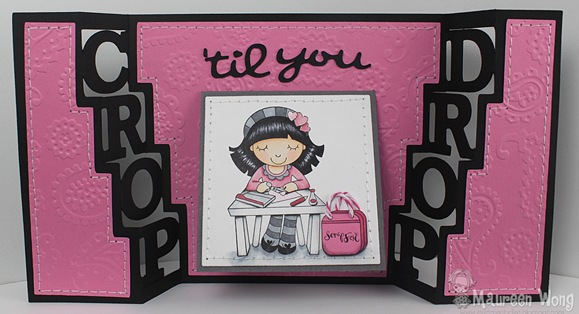
CropperFhiona2a
It's a double stair step card (but this is different than the stair step card familiar to most stampers) - it's made with an electronic cutting machine. I was inspired by this post and this post both from Capadia Designs.

I used Make the Cut software to design the card and cut it with my machine. I also cut the "'til you" words with the machine. The panel that Cropper Fhiona is on lifts up to reveal a space to write a message. And I hope you can see that her bag handles are made from the same Strawberry Cupcake twine as the Shopper card.

So now it's time for you to hop on over to Kerri's blog as she is the next stop on our hop, but I'd love it if you left me a comment before you go!

Thanks so much for hopping with us today! I hope you enjoy our Surprise Release Hop!

Hugs,
Maureen =)

Tuesday, December 14, 2010

Your Next Stamp Challenge #32

Your Next Stamp Challenge

Yay! I have another Your Next Stamp Challenge today! I know the timing is a little weird since it's only been 1 week since the last challenge, but we're switching things up just a bit for the end of the year! Since we know what a busy time this is, this will be our final challenge for 2010 and will last 3 weeks.

Our theme was chosen by Karen and is "Let's Party!" We'd like to see party invites, party decorations, food decorations, party bags, New Year's cards, dressy creations - anything that screams "PAR-TAY!" I decided to go with a New Year's card (or it could be a table decoration):

FairyFhiona3a
I used Fairy Fhiona and the Let's Party set. I stamped Fhiona, colored her with Copics and cut her out, leaving off the wings. I paper pieced her dress, the hat and noisemaker, did some shading with Copics and lots of glittering with Stickles. I cut apart her hands so she could hold the noisemaker and I stuck the hat on her head with foam tape. If you look closely at the top of the hat, you can see I added some pieces of iridescent tinsel that I curled with my fingernail:

FairyFhiona3b
I created the card base in Make the Cut and cut it out with my Cricut. Before gluing down the numbers, I Stickled all the edges. Finally I added Fhiona with foam tape.

We hope you'll play along with us! One lucky participant will be drawn at random to win $10 in YNS Stamp Bucks!! You don't have to use YNS images on your card, but if you do you'll get a double entry in the draw!

Also, the challenge hostess will choose her favorite card, and that winner will get the YNS Challenge "Top Pick" blinkie to proudly display on their blog PLUS $5 in YNS Stamp Bucks! You must use a YNS image to be eligible to be chosen for Top Pick.

Full details can be found at the YNS Challenge Blog. TFL!

Saturday, December 4, 2010

Christmas Gifties!

Today's project doesn't have any stamping on it - a real rarity for me! I needed some fast and fun little gifties so I created a tiny square box using Make the Cut (love this program!). I started out making the boxes 2" square, but then shrunk them down just a little so I could actually cut 2 boxes out of a sheet of 8.5x11 cardstock. I ended up using patterned paper though so they fit easily, but I still kept them the smaller size. Here they are:

Holiday2010Boxes
I cut them out using my Cricut, glued them together and added lots of yummy Timeless Twine and these tags I created in Photoshop (you can enlarge to see the tags better).

You can see that I used all 3 new colors of twine: Holly Berry Red, Olive Green, and the Holly Berry and Olive combo (or you can find a pack of all three HERE). I was really happy when I saw that the twine matches these Basic Grey Christmas papers so well!

I am loving playing with this fabu twine that Stacy sent me (these rolls are HUGE - I think they may just last me forever!), so keep watching this space for more twine creations!

And in case you're wondering, for my tags I used the LD Woodland font for the words, DB Holidays for the gingerbread man, and DB Charlie Calendar for the candy cane and snowman (I also did a couple other designs that aren't shown here - these DoodleBat fonts are loaded with great little designs!).

I'm entering these in the following challenges: I hope you like them and TFL!

Thursday, October 21, 2010

Happy Haunting!

Today is my day to post over at our Paper Craft Planet group so I decided to keep going with the Halloween projects and came up with this card:

HappyHaunting1a
I used the Happy Haunting set and FTL #112 from Clean & Simple Stamping. I stamped the main image a few times and colored with a combo of Copics and Prismacolor colored pencils with odorless mineral spirits.

For the house, I played with Copic Creations' Colorless Blender Tricks challenge: first I colored the house with a couple of different cool grays, then I smushed my colorless blender all over to give the appearance of stones. Here's a close up of the house:

HappyHaunting1b
For the banner, I used Make the Cut to copy my MFT Banner Day Die, but altered the little topper to have a jagged edge instead of the scalloped edge of the Die. I also cut the letters with my Cricut and then sewed it all together.

This card is also for the following challenges: I hope you like it!

In case you don't already know, Karen's birthday is coming up on Monday, so she's having a big sale to celebrate! You can check out the sale items HERE, and while you're in the store, check out the embellishments section to get some great items at 10% off! And last, but definitely not least, YNS now carries Twinkling H2o paints so be sure to check them out as well! Thanks for stopping by!

Monday, October 18, 2010

Trick or Treat!

I have another Halloween project for you today - I decided to make a little matchbox candy holder with a surprise! Here's the outside of the box, top view:

SendMeASignBugg1a
I used Send Me A Sign Bugg, altering her a bit for Halloween! Using Photoshop Elements 8, I erased out the solid white portion of her dress and layered a spider web design behind it (the web was a freebie from the Tiddly Paper Craft Planet group), then I added a sentiment with a little hanging spider. The font is SNF Goody and the spider is from DB Boo Ya.

I colored her with Copics, Stickled her wings, and added a few rhinestones also colored with Copics. Lastly she was cut out and mounted with foam boosters.

Down at the bottom you can see there's a handle to pull the drawer out, and here's what the front of the handle looks like:

SendMeASignBugg1b
I cut out a bone from DB Boo Ya 2 times with my Cricut and glued them together for strength. Then I fashioned a handle from a thin strip of black cardstock and glued the bone to the front.

And here's the surprise on the inside: a little ghost pops out when you open the drawer!

SendMeASignBugg1c


I have to admit that the idea wasn't mine - I came across a pop-up match box while blog surfing!

I cut out a ghost also from DB Boo Ya (love this font!) 3 times, putting 1 through the printer to get the "boo!" on the bottom (also using SNF Goody), then glued all 3 together. Since it's going to be repeatedly shoved into the box, I wanted it to be really strong. Next I cut a strip of acetate 5" x .5" and scored it every half inch. I accordian folded it to make the pop-up mechanism and glued it into the box bottom and to the back of the ghost.

The whole thing was designed in Make the Cut. I also designed the divider to hold the 2 pieces of candy away from the pop-up portion.

This project is for the following challenges: I hope you like it and TFL!

Saturday, October 16, 2010

October Friends of WMS Blog Waltz

Hey everybody! I'm so excited to be playing in my first Friends of Waltzingmouse Stamps Blog Waltz! This month the theme is Autumn/Harvest creations. If you'd like to check out all the participating blogs, you can find the links HERE.

For my project I decided to do another luminaria like the one I did last year.

The embellishing on the opposite sides is the same. Here's one design:

Labels4 1a
And the other design:

Labels4 1b
I redid the file with Make the Cut, adjusting the oval cut out to fit with the stamp I used from Very Vintage Labels No. 4. I stamped the image 4 times, cut them all out with the corresponding Nesties die, and hand cut out the insides of each. I inked all the inside and outside edges of each piece, glued a little leaf print vellum to the backs and added glitter over the thin outer line of the image.

I glued all the images to the box base and then did all the embellishing. The flowers are from Prima and I added a flattened bead cap sprayed with Memories Mist (so they wouldn't be so bright silver) and a 1/4" brown cardstock punch to each. The leaves are also Prima, the branch punch is McGill and the bitty rhinestones are from eBay. For the other side, I hand dyed seam binding with several colors of Distress reinkers and added a button tied with rustic twine.

I also changed the cutting file so that I could use 2 sheets of this 6x6 patterned paper I really like that I found in my stash. The final alteration was an insert I made to hold the votive candle in place. It keeps the candle right in the center of the box even if you move it around. You can see it here:

Labels4 1c

Here's how it looks with the candle turned on:

Labels4 1d
Other Challenges: I hope you like it and have fun with the rest of the Waltz!