Showing posts with label Simon Says Stamp. Show all posts

Thursday, November 5, 2015

Skater Kids

Hi all!  I have a card for a couple of challenges:

SkaterKids1

This looks like it was relatively easy to stamp, but it wasn’t.  I used the Skater Kids stamp set and each top is separate from the bottom.  So I actually used (besides the sentiment) 7 stamps on this card!  Not only did I have to line them all up (which I was unable to do with the bear), but I did some masking so they actually look like they’re standing on each other.  After all that work though, I really like the look of those stacked up skater animals!

For the sentiment, I cut the little tag with Mini Tags and stamped a sentiment from Mini Messages.

This is for Mojo Monday – sketch, and SSS Wednesday Challenge – Thanks/Thanksgiving.  I hope you like it and TFL!

Friday, September 25, 2015

Today is a Good Day

11638805_10207927413971348_1249712840_o

Hi all!  Today I have a card for the Fall Coffee Lovers Bloghop:

TH2015Stamp1a

I did a Fall colored watercolor background with my new Gansai Tambi watercolor paints and stamped the Tim Holtz Stamptember 2015 Coffee stamp on it.  I cut it out with the largest of the Stitched Rectangle die set from Your Next Stamp.

I stamped the image again on a scrap of watercolor paper and watercolored it.  Then I traced the outline of the cup and sign onto a piece of acetate with a wet erase marker.  I used this acetate with my Scan N Cut machine to get it to cut out just the cup portion.  I added that to the background with some foam tape.  Here you can see the dimension:

TH2015Stamp1b

Here’s a start to finish video:

And here’s THE LINK in case you can’t see the video player above.

This is also for the SSS Monday Challenge – Use a stamp and SSS Wednesday Challenge – No Designer Paper.  I hope you like it and TFL!  And enjoy the Hop!!

Sunday, April 6, 2014

Thank You

Hi all!  I have a card for a couple challenges today:

HandWrittenBorders1

I used the sketch from CAS(E) this Sketch, the Handwritten Borders stamp set and the Memory Box Distressed Grid stencil.  I sponged Mowed Lawn and Salty Ocean Distress Inks through the stencil then gold embossed the sentiment over top of the grid.  I finished it off with some Studio Calico sequins.

This is also for Virginia's View Challenge – Stencil and Allsorts – No Flowers.  I hope you like it and TFL!

Friday, February 14, 2014

Happy Valentine’s Day!

Hi all!  Hope you’re having a great Valentine’s Day!  I have a card to share with you today:

WordSalad4

I recently got this gorgeous Heart Wreath die set from SSS and am having a ball playing with it!  For this version, I cut out several from white cardstock and glued them together.  Then I colored with Copics (2 browns, 2 greens and 2 pinks) and added some clear Wink of Stella to the hearts.  Then I stamped the Love from Word Salad and colored that with 3 pink Copics and added Wink of Stella.

I’m linking this up to SSS’s Work It Wednesday.  I hope you like it and have a great day!

Sunday, February 2, 2014

Twinkle, Twinkle

Hi all!  I’m slowly getting back into the challenge groove and I have another couple cards, this time for the CAS(E) this Sketch challenge.  Here’s the first (although it’s technically the 3rd or 4th since I trashed my first efforts):

StarryNight1

I used Make The Cut and my Zing cutter to create a mask out of plain computer paper, then I put down the Stargaze stencil and inked a couple Distress Ink colors through both.  I sponged the same colors on the card base so it would match and added a couple sentiments from the Starry Night set.  Finally I finished the card off with some black sequins.

Here’s my second card:

TalkBubbles5

For this one, I cut a strip of acetate 1.5” wide and used it to mask off my panel.  I sponged a couple Distress Inks around it and then spattered on some Heidi Swap black mist.  I removed the strip and stamped a sentiment from the Talk Bubbles 2 set.  I hope you like them and TFL!

Saturday, February 1, 2014

CASE Study

Hi all!  I really wanted to play with this week’s CASE Study challenge so even though I felt a little mojo-deprived, I went into my craft room and had a play.  I was inspired by the round shape, the colors pink and gold, and the use of sequins.  This is what I came up with first:

TalkBubbles4

I die cut the Catalina Wreath out of white cardstock then smashed it into a Versamark pad and coated with Amuse gold embossing powder.  I had to do 2 layers to get it really nice and smooth.  I sponged the edges of the card with Spun Sugar and Picked Raspberry Distress Inks and added a sentiment from Talk Bubbles 2 in Picked Raspberry.  I added 3 Avery Elle sequins to finish it off.

I wasn’t quite happy with that card so I went back to my desk and had another go at it.  This is what I came up with:

ManyThanksPS1

I die cut the Dizzy Doily out of white cardstock and sponged it with the same 2 pink Distress Inks.  I die cut the Thanks out of white cardstock 3 times and glued them together.  Then I smushed them into the Versamark pad and added the same gold EP.  I embossed the rest of the sentiment (from Many Thanks) on the doily and added 3 gold sequins.  I wish I would have sponged the Raspberry on a little darker, but overall I’m pretty happy with this card!  I hope you like them and TFL!

Sunday, January 26, 2014

Just A Note

Hi all!  I have another card from Day 2 of Stenciled.  This one uses Kristina’s first technique:

SentimentSampler10

I used the Moroccan stencil from SSS and stamps from Starry Night and Giving Thanks.  I sponged on Spun Sugar and Picked Raspberry Distress Inks and added some zigzag stitching and Teal Gumdrops.  Finally I stamped a sentiment from Sentiment Sampler on some Office Depot vellum that I die cut using the Fishtail/Banner die set.  I hope you like it and TFL!

Wednesday, September 18, 2013

Elly Framed

Hi all!  I’m back with another Dilly Beans project for the challenge - washi tape:

EllyFramed1

I used Elly Framed and a bunch of the polka dot MME Washi Tape.  The die and sentiment are from Simon Says Stamp - Expressions For You stamp and die set.

This is also for the SSS Wednesday challenge – use a product from the SSS store and Divas by Design – Anything Goes.  I hope you like it and TFL!

Monday, September 9, 2013

Girl & Butterfly

Hi all!  I have a card using a Dilly Beans image for their Challenge – button using their Girl & Butterfly image:

Girl&Butterfly1 

I used a really old SEI paper pad and the You clear stamp set from Simon Says Stamp for the sentiment.  She was colored with Copics, the button is from a muse|studio and the sequins are from Avery Elle.  I’m also linking this up to the STAMPtember Project share.  I hope you like it and TFL!

Thursday, September 5, 2013

Let Your Dreams Take Flight

Hi all!  I have another Project Life filler card for you today using the Waltzingmouse Pajama Party Sketch challenge:

FineFeathers2

I used a sentiment from Fine Feathers and the Mini Fanciful Flourish die is from Cheery Lynn Designs.  I added a couple of Martha Stewart butterflies and enamel dots to finish it off.

I also have a card for a couple other challenges using the Simon Says Stamp set Circle Friends:

 CircleFriends1

The sketch is from CAS(E) this Sketch and it’s also for Simon Says Stamp – Animal Antics.  It’s finished off with sequins from Darice and scripty washi tape from A Muse|Studio.  I hope you like them and TFL!

Sunday, August 18, 2013

How I killed a card kit – Part 3

Hey all!  Thanks for joining me for Part 3 of my kit killing series!  In case you missed them, here are Part 1 and Part 2.

Today I’m going to start with the 4 1/4 square cards:

CardExchanging12

A simple stamped background using the solid circle in the stamp set, then the little hello sentiment.  I finished it off with some sequins from my stash.

CardExchanging13

This card uses elements cut with some Blueprints dies from MFT.  The little letter was stamped on a scrap of paper, cut out and popped up on foam tape.

And now for the little notecards:

CardExchanging14

This little notecard came in the kit. I just added some pieces of patterned paper that had nice sentiment printed on them and some twine.

CardExchanging15

I really liked this patterned paper from the kit, so I just cut it in half and made it into 2 3x3” notecards.  I stamped simple sentiments on each and tied on some twine from my stash.

And finally, the Project Life items.  A 4x6 title card:

CardExchanging16

I made my own burlap flower by copying the one that was included in the kit and topping it with the other flair from the kit.  The base is a piece of PP and I sewed on a flag that was cut with a Your Next Stamp die.

3x4 journaling cards:

CardExchanging17

CardExchanging18

The card on the right is merely PP that was cut with a Your Next Stamp die and I stapled on a little piece of another PP that says “Don’t forget to be awesome.”  The “hold fast” bit is part of the paper and I thought it would be perfect for PL!  The card on the left is a shaker that I filled with confetti made from the scraps of PP that were left over from the other projects!

Whew!  I can’t even believe myself that I got this much use out of 1 card kit! 

Thanks so much for journeying with me on my kit killing adventure and I hope to be killing more kits in the future!

Saturday, August 17, 2013

How I killed a card kit – Part 2

Hey all!  If you have no idea what I’m talking about, maybe you can go back and check out Part 1 of this series.

Today I’m going to show you the rest of the A2 cards that I made from the SSS August 2013 Card Kit. 

CardExchanging7

I used the stencil again, this time with a light turquoise ink to match the CS in the kit.  I die cut a heart out of the strip with a Nesties die and fishtailed the end.  I sewed the strip onto the card base and stamped the sentiment inside the heart cutout.

CardExchanging8

This card used a sketch from Freshly Made Sketches, pink CS and B&W patterned paper from the kit and the stamp set.  The twine is from my stash.

CardExchanging9

This card used a couple pieces of PP from the kit and a sentiment that I made by cutting up 3 of the stamps in the set (“me laugh,” “my heart happy,” and “every day amazing”).  Don’t be afraid to cut up your stamps to make new sentiments – they’ll still work together after that just fine!

CardExchanging10

For this card, I used Tombow markers to trace inside the holes of the stencil in a rainbow of colors, then took my waterbrush and moved the color to fill in the shapes.  I finished it off with a stitched-on sentiment flag.

CardExchanging11

This last card was an attempt to use up the last whole piece of 6x6 PP that I had left.  I saw the one empty tag on the sheet and was so happy to find that the little hello sentiment from the stamp set fit in it!  Again I colored the heart with a red copic and to make sure you don’t miss it, I die cut an arrow from Your Next Stamp and popped it up on foam tape to point it out.

Please join me tomorrow as I wrap up the series with Part 3!  TFL!

Friday, August 16, 2013

How I killed a card kit – Part 1

I recently came across the phrase “killing a kit” in the Studio Calico forums.  It basically means using up just about everything in a kit.  A while ago I got the August 2013 card kit from Simon Says Stamp and it’s been sitting and waiting for me to play with it.  A few days ago, I made the decision that not only was I going to play with the kit, but I was going to KILL IT!   

(BTW, I have an affiliate link to SSS which means that I’ll get a teeny commission on anything you purchase after clicking on the link in my sidebar, but other than that, I’m not connected in any way to SSS – just a loyal customer!)

Now, less than a week later, I’ve got 11 A2 cards, 2 4.25” square cards, 3 mini note cards, 1 4x6 Project Life title card, and 4 PL journaling cards!!  And just a few scraps of cardstock and patterned paper left over.  This is the very first time I killed a kit and I couldn’t be more excited to share this adventure with all of you!

First of all, here’s a picture of the kit:

SSS_cardkit_august_final_600

It came with a stamp set, cardstock, patterned paper, a note card, some embellies, and a stencil.  Here are some of the A2 cards I came up with:

CardExchanging1

I used the stencil and some white ink to make the background, then attached the flower that came in the kit over a stem I cut myself out of some of the patterned paper.  I die cut the leaves using a MFT die and added a sentiment from the stamp set.

CardExchanging2

I loved the look of the white stenciling on kraft, so I did it again with this card.  A simple sentiment, the heart colored with a copic, and some twine finish it off.

CardExchanging4

This card used half the woodgrain cardstock, the hello flair and the twine from the kit.

CardExchanging3

For this card, I die cut a flower and leaves using MFT dies and added them with some twine from my stash to the other half of the woodgrain CS.  Oh, and I shoved a small pearl into the center of the flower.
CardExchanging5

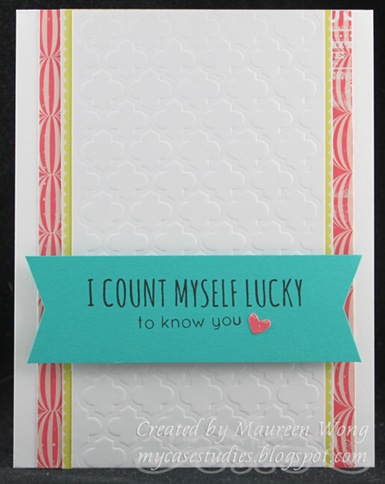
I used the stencil with my Big Shot machine to emboss the white textured panel.  I layered it over 2 different PPs and topped it off with a banner stamped with a sentiment from the kit set and a little die cut heart from Your Next Stamp (that’s a sneak peek at a new die being released this month!).

CardExchanging6 

This last card for today used the pink CS from the kit and a darker pink ink to sponge over the stencil to make the focal pattern.  I added a couple thin strips of lighter pink CS on either side of the panel and finished it off with twine from my stash and a sentiment from the kit set.  I’m entering this card into the SSS challenge – Monochromatic.

I hope I’ll see you back tomorrow for Part 2!  TFL!

Wednesday, April 24, 2013

Hey there Mr. Monkey

***This is my second post of the day. If you're looking for the YNS Hop, please scroll down. Thank you!***

Hi all!  Today there’s a new challenge over at the All That Scraps challenge blog with the theme of Anything Goes!  Here’s what I came up with this week:

MrMonkey1

I stamped Mr. Monkey with Versafine ink onto watercolor paper and watercolored him with Inktense pencils.  I added a speech bubble and sentiment and some black sequins.

We hope you’ll play along with us!  Just remember that you must use a C.C. Designs stamp, including - AmyR, Mashi's Muffins, Sweet November, Lil Lads & Lolitas & Webbie's Words.  TFL!