Tuesday, March 30, 2010

La-La's Weekly Wednesday Challenge #32

If you're looking for the Your Next Stamp Challenge #13, it's the post directly below this one. Thanks!

* * * * * * * * * *


It's time for another La-La's Weekly Wednesday Challenge! This week our theme was chosen by Kristine and is paper piecing. I *love* paper piecing so this challenge was right up my alley! Here's my card:

Lotus1a
I used Lotus this week and a sketch from Our Creative Corner.

I pieced Lotus' dress and sweater and you may be able to see it a tiny bit better in this close shot (you can also click to enlarge):

Lotus1b
In case you didn't think of it, don't forget that you can color right on your patterned paper! Instead of piecing the belt with dark purple paper, I just colored right over the PP with a dark purple Copic. You can't see the pattern through the marker, but even if you did, it would still look great! I also did some shading with a light purple Copic on the dress, and with a light aqua Copic on her sweater. I hope you like it!

Before I go, I want to let you know that whatever image the hostess uses on her project is 20% off for the week of the challenge, and this week it's Rosie with Bird! And since we have a new requirement that you must use a La-La Land Crafts image on your projects, don't forget that we have all these fabulous new digi images available now!

We'd love to have you play along with us! All the details can be found on the La-La Land Crafts blog. TFL!

Your Next Stamp Challenge #13

Your Next Stamp Challenge

Yay! I have another Your Next Stamp Challenge today! This time our theme was set by Karen and is Purple - go crazy or just add a touch as long as your card has purple on it.

Ever since I saw my fellow Starlet Angela alter Hoppy Easter Fhiona to be a ladybug instead of a bunny, I knew I wanted to try altering her too! I thought she would look great as a butterfly and here's what I came up with:

HoppyEasterFhiona1
In case you're wondering, here's what she originally looked like:

I stamped her on white cardstock and colored just her face with Copics, then I stamped her on the dark purple patterned paper. I also stamped the bow portion onto light purple PP, cut it out and glued it on. I cut the purple PP version out, leaving out the ears and basket. The antenna are a Quickutz diecut and you can see that I also cut off her legs and repositioned them to look more like she's flying instead of just standing on the ground. I also cut out the face from the purple version so the Copic version could show through. Lastly, the wings are a Spellbinders die and the sentiment is from Papertrey Ink.

Here's a close shot so you can see her a little better:

HoppyEasterFhiona1b
I had so much fun altering her, I will definitely be trying it again in the future! I've already got a couple more ideas so hopefully I'll be able to share them sometime soon!

Challenges: We hope you'll play along with us! One lucky participant will be drawn at random to win $10 in YNS Stamp Bucks!! You don't have to use YNS images on your card, but if you do you'll get a double entry in the draw!

Also, the challenge hostess will choose her favorite card, and that winner will get the YNS Challenge "Top Pick" blinkie to proudly display on their blog PLUS $5 in YNS Stamp Bucks! You must use a YNS image to be eligible to be chosen for Top Pick.

Full details can be found at the YNS Challenge Blog. TFL!

Monday, March 29, 2010

Happy Spring Chickie!

It's not Wednesday, but I do have a Your Next Stamp card for you today! The reason is because YNS is sponsoring the Embellish Magazine challenge! The theme is to use the colors light aqua, kraft and light pink, and also to include stitching. I had fun with this challenge and here's what I came up with:

FhionasLittleEasterBuddy1
(I hope it's ok that I added just a touch of orange for the beak and feet!)

I used the adorable Fhiona's Little Easter Buddy set, which includes the Happy Spring sentiment. I stamped the chick right on the pink cardstock, then colored the beak and feet orange, then went over all the feather lines with a pink Copic. I also did some shading on the chick with a really light pink, but it's not showing up in the picture.

This card was also done for the following challenges: We hope you'll play along with the Embellish Magazine challenge - you can win some great YNS stamps!! You have until April 8 to enter. TFL!

Tuesday, March 23, 2010

La-La's Weekly Wednesday Challenge #31


Wednesday means it's time for another La-La's Weekly Wednesday Challenge! This week our challenge was set by the amazing Kim and is to make your own flower. This is the *perfect* challenge for me as I just made some flowers for my LLWWC#30 and even posted a mini tutorial on how I did it! I decided to use the same method for making my flower this week, except I did some layering with different sizes of dies.

First off, here's my card:

RosieBirthdayPresent1a
I used Birthday Present Rosie and a sketch from Friday Sketchers.

I colored Rosie with Copics and paper pieced her dress. Here's a pic to show the different parts I used:

RosieBirthdayPresent1b
You can see on the bottom layer how I use paper punches of scrap cardstock to pop up some layers. I use the scrap CS instead of foam boosters when I don't want as much height. In this case, I wanted just a little poof for the bottom of her dress and to make the present stand out just a tiny bit. You can also see that I test-colored the bottom present blue and green, but didn't like it so the "real" present ended up yellow and green. Once everything's glued together, you can't even tell!

Here's a more detailed tutorial on how I made the Nestabilities flower. First I cut out the 2 sizes of Blossom Two that I want to use and lightly sanded the edges:

RosieBirthdayPresent1c
Next, I turned them both over and drew cutting guidelines with a pencil and ruler:

RosieBirthdayPresent1d
In this picture I've drawn in red how I cut out little slivers from between all the petals. I don't actually draw those, I just cut them freehand. You can see that I've started to cut the slivers from both flowers and that's the rubbish on the side:

RosieBirthdayPresent1e
Once all the slivers are cut, I gently shape the petals of the flowers. I've also cut out the smallest size of Blossom Two for the center and left it as is. I've poked a tiny hole in the center of each to help me line them up nicely when I put all the layers together:

RosieBirthdayPresent1f
Finally, I just glued all 3 layers together and added a button tied with crochet thread. I really love the look of this flower so I hope you do too because I'm sure you'll see them on my cards every now and again!

Before I go, I want to let you know that whatever image the hostess uses on her project is 20% off for the week of the challenge, and this week it's Porsha! And since we have a new requirement that you must use a La-La Land Crafts image on your projects, don't forget that we have all these fabulous new digi images available now!

We'd love to have you play along with us! All the details can be found on the La-La Land Crafts blog. TFL!

Tuesday, March 16, 2010

La-La's Weekly Wednesday Challenge #30

If you're looking for the Your Next Stamp Challenge #12, it's the post directly below this one. Thanks!

* * * * * * * * * *


Wednesday means it's time for another La-La's Weekly Wednesday Challenge! This week our theme was set by the sweet and ultra talented Elena and is "Go Green." But before you rush off to make your project, let me tell you that this is NOT a color challenge! Elena wants us to recycle! She has a bunch of great ideas on recycling things for cardmaking on the blog, so if you get stumped you can get some inspiration there!

Here's what I came up with:

MayaEaster1
I used Easter Maya and a sketch from Friday Sketchers, who is sponsored this week by La-La Land Crafts!! You still have a little time to enter and you could win 3 digi images of your choice so hurry and check it out!

Maya was printed on my laser printer and colored with Copics. I cut her out with Nestabilities and hand cut the mat using the die as a template. For the recycling challenge, I die cut some flowers out of an old horoscope book using the Nesties Blossom Two dies. I like the original shape of the dies, but wanted them to look a little more flower-y, so I trimmed them up a bit. Here's how I did it in case you're interested (you can click to enlarge):

BlossomTwoTutorial
The first diecut is the original shape. Next I turn it over and use a ruler and pencil to draw cutting guidelines. The third sample has red lines drawn showing roughly how I cut the slivers out and the fourth sample is the finished flower with a little shaping and a button center.

This card is also for the following challenges: Before I go, I want to let you know that whatever image the hostess uses on her project is 20% off for the week of the challenge, and this week it's Pirate Lala! And since we have a new requirement that you must use a La-La Land Crafts image on your projects, don't forget that we have all these fabulous new digi images available now!

We'd love to have you play along with us! All the details can be found on the La-La Land Crafts blog. TFL!

Your Next Stamp Challenge #12

Your Next Stamp Challenge
Yay! I have another Your Next Stamp Challenge today!

This time our theme was set by the super talented Cabio and is distressing. I usually do some distressing on most of my cards so this was a fun challenge for me! I just stepped it up a bit, doing a little more distressing than I normally do and here's what I came up with:

JustSwimmingByMermaid1a
I used the Just Swimming By Mermaid set and a sketch from Card Patterns.

I stamped the mermaid on white cardstock, colored her with Copics and cut her out. Then I stamped her again on the green patterned paper and just cut out her tail and shells. Then I stamped just her head on red PP and cut out the seahorse. The tail was glued directly to the cardstock, but the shells and seahorse were popped up on scrap cardstock bits. I also added a little rhinestone to her shell top and itty bitty star rhinestones over her star earrings. Finally I stamped the shell 3 times onto the same green PP and cut them out, also popping them up on scrap cardstock.

For my distressing, I ran my scissors over the edges of all the papers, inked all the edges, and tore the bottom of the red PP. The sentiment is from the Flying High Fhiona set. The PP is all from Cosmo Cricket.

We hope you'll play along with us! One lucky participant will be drawn at random to win $10 in YNS Stamp Bucks!! You don't have to use YNS images on your card, but if you do you'll get a double entry in the draw!

Also, the challenge hostess will choose her favorite card, and that winner will get the YNS Challenge "Top Pick" blinkie to proudly display on their blog PLUS $5 in YNS Stamp Bucks! You must use a YNS image to be eligible to be chosen for Top Pick.

Full details can be found at the YNS Challenge Blog. TFL!

Wednesday, March 10, 2010

La-La's Weekly Wednesday Challenge #29


Wednesday means it's time for another La-La's Weekly Wednesday Challenge! This week I'm hosting the challenge and because La-La Land Crafts released 6 awesome new Spring digi images last week, I decided to do a color challenge - please use pastel colors for your creations.

Here's what I came up with:


I picked Easter Bunny Rosie this week (isn't she adorable?!) and knew I wanted to do an egg shaped card with this Cosmo Cricket patterned paper as the decoration on the egg. Then I saw a card in the March issue of Cards Magazine that had an egg with a scalloped mat and knew I had to make a scalloped mat for my egg too!

I used Design Studio and the Doodle Charms cartridge because it already has an egg shape that I like. I cut one egg out of PP, then made a card base out of the same shape that I cut out of white cardstock. Lastly I had to create the scalloped mat by placing circles all around the plain egg shape, and then I cut that out of white CS as well.

Rosie was printed with my laser printer and colored with colored pencils and odorless mineral spirits. I cut her out, leaving a small white border so she would stand out from the PP background. I taped a strip of ribbon to the PP egg, then stitched it to the scalloped mat. I glued the egg to the card base, then added the image, 'bellies and a sentiment from Papertrey Ink. I hope you like it!

This is also for the following challenges: We'd love to have you play along with us! All the details can be found on the La-La Land Crafts blog. TFL!

Saturday, March 6, 2010

Button Bits - Finally!

Another just for fun card! I'm ashamed to admit that I've had this Everyday Button Bits set since it first came out forever ago and haven't actually made a card with it until now:


I used the Mojo Monday sketch, stitching some cross-stitches on the ribbon instead of putting the 2 rectangular elements because I really wanted a clean and simple card.

This is also for Quixotic - "Leave it out" (use leaves on project) and InStyle Stamps - use ribbon. I hope you like it and TFL!

Wednesday, March 3, 2010

La-La Land Crafts Spring Release Blog Hop

*****If you're looking for the YNS New Release Blog Hop, it's the post right below this one. Thanks! *****


Hello everybody and welcome to my stop on the La-La Land Crafts SPRING Release Blog Hop!

If you came here from Jane's blog, then you're on the right track. If you just happened on my blog, you'll want to go back and start at the La-La Land Crafts blog!

For this release, you asked and we listened: We are going DIGITAL!!! All of our images in this release are available as digi stamps!! We cannot be more excited to move in this direction. No, we are not going to stop making rubber stamps. We are expanding our collection by providing you with more options for your paper crafting needs.

To celebrate the release of our new Spring Digi Stamps, we are doing a bunny trail blog hop! Along with the cards created by the Design Team and Guest Designers, you will find some clues (a secret word or two) on every blog. When you follow the order of the Blog Hop and get to the end, you will have collected all of the words to make a sentence. When you are done, you will need to go back to the La-La Land Crafts Blog and leave a comment there.

What's in it for you? Besides seeing all the gorgeous eye candy from our designers, the winner of the Blog Hop will receive all the goodies in the picture below:


- Webster's Pages 6" x 6" Lullaby Lane & Life's Portrait Combo Pack
- Prima Flowers Athena Flowers Coral pack
- Spellbinders Tulips Impressabilites
- Flower Soft in Sweet Pea
- Three packs of Mark Richards jewels
- our Sweet Friends Rosie stamp

What's even more? While on your treasure hunt for secret words, you might even find some more treats offered by our designers! And the best news: All of these DIGITAL stamps are already available for purchase in our online store for $4.25 per image or get ALL SIX for $20.00 as our limited time Spring Bundle... an AWESOME savings of 20%! Please see the online store for all the details on purchasing these new digi images.

What do you have to do to join our Blog Hop?

* Start your Blog Hop at the La-La Land Crafts Blog.

* Each DT/Guest DT Member will guide you to the next stop on the Hop.

* Collect all of the secret words and put them together into a sentence.

* Final stop is back at the La-La Land Crafts Blog where you have to leave your comment under this post. IMPORTANT!!! Do not reveal your answer in your comment!! We will contact the winner for the answer. If the answer is incorrect we will draw the winning number again..

One entry per person please. We will draw the winning number from all the entries next Wednesday, March 10th , around 10 am PST. Everyone is welcome to participate, even if you don't have a blog. And, we will ship internationally!!

We would really appreciate it if you could help spread the word about our Blog Hop on your blog or just by the word of mouth if you don't have a blog :-)

And now for my secret words: the bunny.

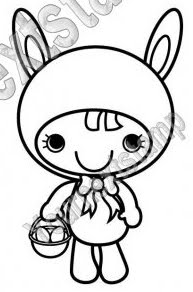
Here's the image that I used for my card today - Lala with Bunny:


And here's my finished card:

LalaBunny1a
I printed Lala at 3.5" high using my black laser printer on Georgia Pacific cardstock. I colored her with Copics, cut her out and popped her up on foam boosters. Since I like to cut right up against the print lines, sometimes I get little bits of toner flaking off. If that happens, I just run a black Micron marker over the white spots and you can't even tell the difference!

Here's a close up of the star of the show, Lala with Bunny:

LalaBunny1b
This card is also for the following challenges: Whew! What a list!! It's been a while since I combined so many challenges! I hope you like my card and TFL!

And now your next stop is the super funny and creative Lisa! Have fun on the rest of the Hop and good luck!!

Other materials: papers and flower brad in the top corner - Making Memories; sentiment, Dark Chocolate ink and button - Papertrey Ink; ribbon - local craft store; big butterfly punch - Martha Stewart; tiny butterfly punch - Fiskars; photo corner and scallop border punches - Stampin' Up!; Birds and Swirls embossing folder - Cuttlebug; charm and tiny pearls were bought on eBay.

Tuesday, March 2, 2010

YNS New Release Hop & Challenge #11

Photobucket

Hello everybody! Thanks for joining us for another fun and fabulous Your Next Stamp Blog Hop! YNS just released 3 Easter-themed sets (Fhiona's Easter Basket, Hoppy Easter Fhiona, Fhiona's Little Easter Buddy) and 3 Mother's Day-themed sets (Flower Bouquet Fhiona, You're Fabulous, Cheers!) so the Starlets (and our awesome guest designer!) have whipped up some eye candy using many of the new images.

If you came here by way of Amy's blog, then you're on the right track! If not, please go back and start at Karen's blog because you won't want to miss a stop!

Also, since it's a challenge Wednesday, we have a new challenge for you! The theme was set by Amy and is to use a Big Bow!

Because we've combined a Challenge with the Hop, our prizes and rules are a bit different. Please read all about them on the YNS Challenge Blog (which is also the last stop on the Hop). Entries for Challenge #11 and our new release BLOG HOP close at Midnight (EST) on Tuesday, March 16th.

*****And now on to the show!*****

For the Hop, the Starlets were asked to create a card and matching gift bag/box/basket. And of course, we were also to add in the Challenge element of using a big bow. Now I have to admit I messed up the challenge and didn't make my bows very big, but we'd like to see some really fab, big bows on all your projects!!

I had the super cute and fun Cheers! set by Dale Designs, and I came up with this set:

Cheers1a
My mom really likes these little on-the-go drink mixes so I made a sampler set for her to have a bunch of different flavors (the tin holds 14 packets perfectly!).

Cheers1b
The sketch for my card is from Sunday Sketch & Stamp (and was created by my fellow Starlet Simonne!) and the papers are really old Basic Grey that matched many of the colors on the drink packets.

For the flower, I used the Spellbinders Blossom Two die set. After cutting out the big blossom, I snipped out just a tiny bit between each petal to give it a slightly different look. Then I rounded the petals and added a smaller die cut from the same set with a button and twine bow. The Ms are Sizzix dies.

Cheers1c
The container for the drink packets is a Maya Road tin that came with 'bellies in it. I made a pattern for the top using printer paper and then cut the patterned paper with it, finishing it off with a straight stitch all around the outer edge. The drink was stamped, colored with Copics and then I went over the "liquid" portion with Stardust glitter pen spread with a waterpen. Finally I cut it out and popped it up on foam boosters. The middle portion was made with the Nestabilities Labels Four and Quickutz letters cut from foam and then covered with glitter. The flower was made the same as the one on the card.

Both card and gift qualify for these challenges as well: I hope you liked my projects and thanks for hopping along with us! Your next stop is the incredibly talented Angela.